Beaucarnea recurvata

How to Grow a Ponytail Palm

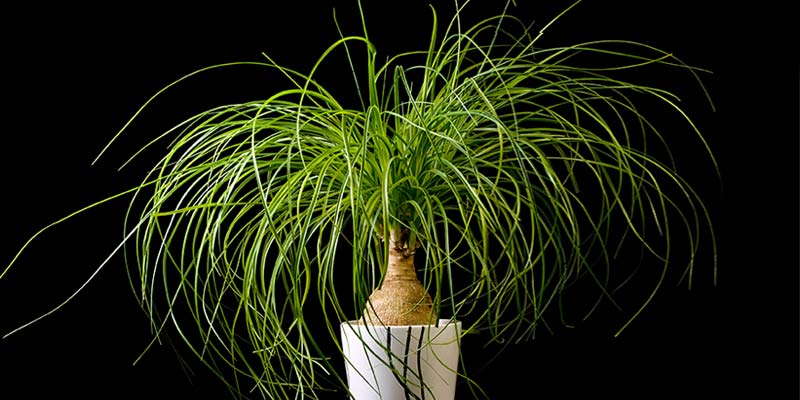
As one of the most popular houseplants found in homes all around the world, the Ponytail Palm (Beaucarnea recurvata) is one of the easiest to grow and require very little maintenance by their owners. If you’re looking to add a splash of charm into your home, but don’t want to put much time or thought into it, then this tropical houseplant may just be the perfect choice for you.

Originating from the arid landscapes of Mexico, the name Ponytail “palm” is a bit of a misnomer. While the bulbous trunk indeed had some similarities to the trunks of other palm trees, the Beaucarnea recurvata is actually a drought-resistant succulent. And that bulbous trunk is where the plant stores its water.

Ponytail Palm

How to Care for Ponytail Palm

Ponytail palms are one of the easiest houseplants to care for.

They require little water, love lots of light, you don’t have to fertilize often, and they have the ability to adapt to the comfortable temperatures often found in homes. The downside of growing a ponytail palm inside your home is the incredible slow pace in which they grow.

As long as you don’t over-water it, you probably won’t kill it. It’s pretty much that simple.

However, if you want your plant to grow tall, thrive and be healthy, there are some easy guidelines you can follow to help you provide the best care for your ponytail palm.

Botanical Info

Latin Name Beaucarnea recurvata
Plant Family Asparagaceae
Genus Beaucarnea
Common Names Ponytail Palm, Elephant Foot Palm, Bottle Palm, Nolina Palm
Origin Mexico, South America
USDA Zone 10 – 11

Growing Conditions

Water Once every ~10 days.
Light Bright & full exposure to sun.
Soil Cactus potting soil.
Fertilize Once a month. Diluted liquid fertilizer.
Temperature Warm. Keep above 55°F.  
Humidity Adaptable. Not too low.  
Maintenance Easy to care for.  
Grow Inside? Yes
Grow Outside? Yes. Best in USDA Zone 10 – 11
Safe for Pets? Yes. But, care should be taken.
Container Size Depends on how large you want it to grow.  

7 Common Questions About Ponytail Palms

To help ensure that you’re providing to proper care for your ponytail palm, we have listed out the most frequently asked questions down below. If you have a question that you don’t see listed or would like to add additional feedback for others to learn from, please leave it down in the comment section below.

1. How often do you water a ponytail palm?

Not often, but the frequency depends largely on the environment you’re growing it in. Below, we have some general guidelines to watering a ponytail palm, but the best advice is to give it a drink of water when you see the soil start to dry.

  • During Hotter Months — You’ll want to water your ponytail palm plant once every 7-10 days.
  • During Cooler Months — You’ll want to slow down the watering schedule to once every 20-30 days.

If you don’t abide to that precise schedule, don’t fret. This plant is great at surviving long periods without water. But, if you want a healthy plant that grows to its fullest, you should try to follow the watering guidelines listed above.

Remember: The easiest way to kill a ponytail palm is by over-watering. Less is more.


2. How much light does it need?

Ponytail palms love lots of light. Remember, this plant is native to arid deserts, so full exposure to the sun will be appreciated by this plant. However, while full exposure is recommended, ponytail palms are adaptable to little or moderate amounts of light.

The downside of less light exposure is that you’ll see a noticeable slow down in its growth. And for an already slow-growing houseplant, this may just completely stunt it.

So, if you want your ponytail palm to grow tall, give it lots of light.

3. How often should I fertilize a ponytail palm?

Depends on the season and environment you’re growing your ponytail plant in. A general guideline is to fertilize your plant once every 3 or 4 weeks. If you see the tips of the leaves start to turn brown, then you’re using too much fertilizer.

  • Spring & Summer — Add fertilizer once every 2 or 3 weeks.
  • Fall & Winter — Add fertilizer once every 4 to 6 weeks.

Adding fertilizer is essential to the overall health of houseplants, and Beaucarnea recurvata is no different. Liquid fertilizers are recommended for ponytail palms, but granular fertilizers will also suffice. An all-purpose fertilizer will work fine here, but you can also consider using one formulated for cactus and other succulents.

4. What kind of soil should I use?

The best type of soil for this plant is one that drains quickly. Unlike many popular tropical houseplants, the last thing the ponytail palm wants is to sit around in moist soil for an extended period of time.

When you repot or transplant, it is recommended that you use a soil designed for cactus or succulents. If you want to make your own soil mixture, keep it light on the amount of peat you use within.

Remember: Keep the soil dry, and water sparingly.

5. Is repotting possible with a ponytail palm?

Yes, repotting a ponytail palm is possible and easy to do, but precautions should be made before you undertake this effort.

  • Size Matters — First, consider how large the tree is, and where you’re going to be moving it to. Larger plants will likely require more help from others, as well as a few other tools or equipment to assist in the transplant. On the flip side, if you’re repotting a small bonsai ponytail palm, then you likely won’t need any help or special tools.
  • Do In Spring — It is recommended that repot your ponytail palm early in the growing season, as this gives it plenty of time to adjust to the larger pot and form strong roots.
  • Examine the Roots — Once you have it out of the original container, take a close look at the roots of your plant. Look for any signs of bugs, rotted areas, or anything that looks injured or contaminated. Cut these off before you repot in new container.

Keep in mind: Transplanting it to a larger pot will encourage the plant to grow larger. This may be a deal-breaker for anyone growing a bonsai palm.

6. Is this plant safe for pets?

According to the ASPCA, the ponytail palm does not pose any toxicity threats to dogs or cats.

However, every homeowner with pets should know, and possibly take precautions if deemed necessary, that the leaves of the Beaucarnea recurvata contain saponin which may cause discomfort in some animals if ingested. So, while it’s unlikely that any harm will come to your dog or cat, it may be wise to keep an eye on them and ensure that they are not eating or chewing on the leaves.

It’s also worth noting that saponins are found in many popular houseplants, not just the ponytail palm. They also pose no danger to humans. In fact, saponin is found in many dietary supplements and are suggested to have some nutritional benefits.

7. Can you grow a ponytail palm outside?

Yes, but it’s recommended that you live in USDA Plant Hardiness Zone 10 or 11 if you want your plant to thrive. The sandy soil and hotter temperatures create an ideal environment for growing the ponytail palm outside.


Broken CFL Bulb

How to Clean Up a Broken CFL Bulb

Using compact fluorescent light (CFL) bulbs in your house is a great way to use less energy, save a little bit of money on your utility bills and help protect the environment.

However, breaking one of these bulbs, as simple as it may seem, can create a dangerous situation. Because of the trace amounts of mercury inside the bulb, it’s important that you take proper precautions if you ever find yourself having to clean up a broken one.

Is a Broken CFL Bulb Dangerous?

Yes, it can be a potential safety concern. The tiny shards of glass that come from the broken bulb can easily cut open your skin.

But, that’s probably not why you’re reading this. I’m willing to guess that you’re concerned about the small amounts of mercury inside of a CFL bulb, and, perhaps, what it’s going to do to your indoor air quality. This is a valid concern.


Is There Mercury In CFL Bulbs?

Yes. It’s true that CFL bulbs have mercury inside them. And yes, if one of these bulbs break open inside your home, your indoor air quality could deteriorate if you don’t take proper precautions.

However, this scenario is much like many other emergency-like situations that homeowners often face. When something goes wrong, you take action before it gets worse. It’s simple.

Let’s look at the science:
  • Study from 2008: CFL bulbs tested contained about 3-5 mg of mercury, but the energy savings of each bulb prevents about 4.5 mg of mercury from being emitted into the air by power plants. Interestingly, this study also found that CFL bulbs contain about 1% of the mercury as old thermostats (500 mg).
  • Study from 2011: CFL bulbs tested only contained 0.1 to 3.6 mg of mercury, and would take up to ten weeks to emit vapors that would be considered hazardous to human health.
  • Study from 2012: Concluded that young infants were at the highest risk, and clean-up within the first four hours after a bulb breaks is “critical.” The study also noted that the temperature and ventilation of the room play a big role in whether the air is safe to breathe.

So, yes… A broken CFL bulb can be dangerous, especially for younger kids. But the danger can be minimized if you act quickly and follow a proper cleanup process.

For more information about the dangers of mercury, please visit the EPA’s website.


How to Clean Up Broken CFL Bulb

Cleaning up a broken CFL bulb isn’t a difficult or harrowing task. It’s a rather simple process that doesn’t require a professional and can be completed within a few minutes. However, because CFL bulbs contain mercury, the process for cleaning it up is a bit more complicated than simply picking up glass.

Below, we have explained the process you should follow if you break a CFL bulb, as well as some general tips that every homeowner should know before they start.

How to Clean a Broken CFL Bulb

Gather Your Materials:

  • Cardboard, heavy-duty paper or plastic scoop.
  • Tape, damp paper towels, or cleaning wipes.
  • Plastic bag or glass jar with lid.

Procedure for Clean-Up:

  1. First, use your cardboard or stiff paper to scoop-up the large pieces of the broken CFL glass.
  2. Next, use tape or damp paper towels to help remove the smaller shards of glass.
  3. Continue previous step until you feel confident that all glass shards have been removed.
  4. Wipe area with disinfectant wipes.
  5. Put all materials into your bag or glass jar, and seal completely.
  6. Dispose immediately.

Note: A glass jar with a tight fitting metal lid is the best item to dispose of the broken shards of glass because it keeps the mercury vapor sealed inside.

If one is not available, a sealable plastic bag, such as a large ziploc bag, will suffice. However, if you go this route, try to handle it as little as possible. You may also want to wear disposable gloves or gloves you don’t mind throwing away in order to prevent the glass shards from cutting your hands.


General Tips Every Homeowner Should Know

Know that you have a better understanding of how to clean up a broken CFL bulb, let’s take a closer look at a few other factors that will help protect you from the mercury inside.

1) Shut Off Central AC

The first step is to turn off your air conditioner, heater, fans or any other appliance that circulates air throughout your home.

The goal with this first step is to prevent the air in the “zone” with the broken bulb from spreading throughout your home. If the area has been exposed to elemental mercury, than it is important that you prevent the air from dissipating to other areas of your home.

2) Air Out & Ventilate Room

Now that you’ve shut off all air conditioners in the room, open the windows and allow the room to “air out” a bit. As noted in the studies above, a well-ventilated room is an important step to limit your exposure.

It would be wise to instruct all people and pets to leave the room immediately, taking precautions to avoid the area where the bulb was broken. Once everyone has left the room, you should open windows, doors and vents to the outside, but not into the house. Use this time to gather your materials.

CFL Bulb

3) Clean Up Within Four Hours

Allowing the mercury to sit, undisturbed, in a room with no ventilation is extremely unsafe and will quickly degrade the indoor air quality of your home. If you’re using an air conditioner, no matter what kind it may be, turn it off.

As the study above concluded, the first four hours are the most important. Try to clean it up within that time frame.

You have absolutely nothing to gain by waiting.

4) Safely Collect & Seal Debris

After you’ve gathered what you need, re-enter the room where the CFL bulb was broken. Leave the windows, vents and doors to the outside open in order to continue to let the mercury vapor dissipate.

Scoop up the larger pieces of glass from the floor. Place the shards into the glass jar or ziploc bag. Use the tape to pick up the smaller pieces of glass. Make sure that all glass is removed from the hard surface or carpet.

Once the glass has been picked up and placed in the jar, use the damp paper towels to clean the affected area. Disposable disinfectant towels will also be good for this purpose. All of these wet wipes should be placed inside the jar or ziploc bag. If you wear disposable gloves while cleaning up the mess, those too should be discarded inside the container

Once this has all be completed, tightly seal the jar or ziploc bag.

5) Remove From Home Immediately

Now that the broken bulb has been picked up, remove it from the house immediately. This is especially important if you used a plastic bag. This is because the plastic may not completely contain the mercury vapor inside. If not, it may then leak out into the air inside your home.

6) Never Use a Vacuum Cleaner. Ever.

Trying to vacuum up the glass from a broken bulb will only further fan the mercury vapor into the air. This is exactly what you want to avoid. Contain, not circulate.

Of course, depending on the type of floors that the broken bulb is on, this is easier said than done. Below, we have listed out some tips for cleanup based on the type of flooring.

  • Hardwood & Tiled Floors — It would be avoid the vacuum cleaner entirely. Stick with using a steam mop, swiffer or wet wipes to clean up the tiny shards of glass.
  • Carpets & Rugs — On a carpeted area, it can be difficult to find all the smaller pieces of glass from a broken bulb. Vacuuming can help, but it should be done with windows open and entry ways into the rest of the house closed.


No matter what type of flooring you have, once you completed the cleanup process listed above and picked up as much of the broken bulb as possible, you will be able to then — and only then — use the vacuum cleaner.

Note: If you decide to use the vacuum cleaner, it would be wise to use the hose attachment, keep the area well-ventilated and dispose of the bag / empty the canister as soon as possible. You don’t want CFL debris sitting inside your vacuum cleaner for an extended period of time.

7) Always Wash Your Hands Immediately After

Even if you wear gloves when you clean up the broken bulb, there is no guarantee that mercury didn’t get onto your hands. After cleaning up the shards of glass and throwing all the debris away in the best possible way, thoroughly wash your hands with soap and hot water.

This will help remove any small pieces of glass that may be lingering on your hands. It will also give you more peace of mind about residual mercury.

8) Dispose Hazardous Waste Correctly

Check your local regulations for the best way to properly dispose of broken CFL’s. Some municipalities may require you to dispose of the hazardous waste in different manners. Some simply allow you to throw it out with your garbage.

Of course, you could always toss it out and know one would ever know. But, you don’t want to inadvertently contaminate another area of our community. So, be a good neighbor, follow the law and dispose accordingly.


Summary

Cleanup of any broken CFL bulbs should be prompt and precise. Shut off your air conditioner to prevent circulation of air. Open windows to ventilate air in the area. Never, ever use a vacuum cleaner. And, seal the broken shards in bag or jar and remove from your home as soon as possible.

Wasp

How to Get Rid of Wasps & Hornets Around Your Home

Wasps. The winged menace that take over patios and gardens all around the world. The evil cousin of the honey bee that fears no human.

Well, that’s their reputation, but an obvious exaggeration.

For the most part, wasps, hornets and yellow jackets generally try to avoid human interactions. Regardless, very few homeowners welcome the spring invasion of nests. It’s always preferable to ensure that these insects are kept away, especially if their nest is near a doorway or other area that increases your chances of crossing paths.

With this in mind, let’s discuss some methods that every homeowner should know to get rid of wasps, create an unwelcome environment, and, most importantly, help you avoid getting stung.

How to Keep Wasps Away From Your House

Like many other insects in your garden, wasps are going to go where they believe food is. So, if you want to limit the amount of wasps living near your home, then you need to attempt to limit their food source. This means ensuring that no food is left out in the open. Especially, sugar sweets and fruit.

During the summer, you may enjoy having a meal in your backyard. All that food can be rather enticing for wasps, yellow jackets and other insects. That is especially true if you have anything sweet in the vicinity such as an open can of soda or juice box. Always cover your drinks if you are outside.

Citronella Plant

Grow Plants That Wasps Don’t Like

A great way to prevent wasps from living around your home is to grow plants that will deter them. This is an ideal solution for homeowners that want to keep wasps at bay, while also adding beauty to their yard.

Generally, wasps do not go near the following plants:

  • Citronella
  • Mint
  • Eucalyptus
  • Wormwood

Incorporating these plants into your landscaping will help create an environment that wasps and hornets do not like. Therefore, they will likely look for another location to build their nest.

Bonus: A few of these plants also repel other pesky insects, such as mosquitoes.

Maintain Your Fruit Trees

Additionally, you want to be mindful if you have any fruit trees in your yard. Throughout the year, a piece of fruit may fall off and smash to the ground. With all the sweet juices now in the open, it can attract certain pests, including wasps.

Try not to make the area more appealing than it needs to be. Regularly inspect underneath your fruit trees and remove any pieces of fruit as soon as they hit the ground.

Create & Hang a Fake Nest

Wasp colonies are incredibly territorial. If wasps believe there is another colony already living in the area, then they are likely going to look elsewhere to make a home.

Hornet Nest

There are a couple of ways to accomplish this. The easiest method would be to buy a fake nest online. Or, you can make a fake nest with a brown paper bag.

How to make a fake wasp nest:

  1. Fill your brown paper bag with crumpled newspaper or debris.
  2. Close off the opening with sting or tape.
  3. Crumple the bag a little bit, to give it the appearance of a hornets nest.
  4. Hang it in the area where you don’t want wasps buzzing around.

This is a great way to deter wasps, as they will not want a confrontation with other colonies already living in the area.

Other Ways to Prevent Wasps From Living Near Your Home

While the food source is going to be the best method, there are a few other ways you can deter wasps and yellow jackets from living around your home.

  • Seal Cracks, Window Frames & Entry Points:

    Before summer comes around, you should thoroughly inspect your house to see if there are any cracks or other entry points in the siding. You should also inspect door and window frames to make sure there are no areas for wasps to get into.

  • Sweet Perfume:

    You also want to avoid wearing any sweet perfume during the summer. The scent you are emitting can attract the pests.

  • Bright Clothes:

    Finally, avoid wearing clothing that contains flower imagery or is generally bright. That can catch wasps’ attention, and they may curiously come to you to see if you are actually a flower.

TL;DR — If you do not give wasps a reason to buzz around your property, then they are probably going to go elsewhere and leave you alone.


General Tips to Removing a Nest

If you decide you want to get rid of a wasp nest on your own, then it would be wise to understand and follow these general tips.

Wasp Nest
  • Wear Protective Equipment:

    Keep yourself safe by wearing long sleeves, protective eyewear, and gloves. If you have a bee hat, that would be ideal. But, most homeowners will not have these.

  • Neutralize at Night:

    To ensure you kill the entire colony, as well as the queen, it is recommended that you exterminate the nest at dusk or night. Not only are wasps and hornets less aggressive at this time, but the entire colony will be back in the nest for the night.

  • Locate & Target the Opening:

    If possible, try to locate the opening of the nest. This will usually be located near the bottom. Spray your soapy water or pesticide in this area first, and then target the rest.

  • Do Not Stand Below the Nest:

    Most wasps and hornets will fall the moment they get sprayed. Because of this, you should not stand directly below the nest, unless you want to be exposed to chemicals or get stung by falling wasps.


4 Methods to Kill & Remove Wasps

In the event that you notice wasps, hornets or yellow jackets buzzing around your home, then your already beyond prevention. You’ll need to find a way to remove them.

The easy way would be to simply spray them with pesticide. But, do you really want to spend money to spray a poisonous substance around your home? Instead, try using a few of these tips to help you get rid of wasps naturally.

1) Spray With Soapy Water

An easy, DIY alternative to spraying pesticide is to create a solution of dish soap and hot water. Spray this onto the nest. This is the recommended first step that every homeowner should try. This will kill the wasps naturally and, most of the time, instantaneously.

How to Make:

  1. Mix solution in a spray bottle.
  2. For every cup of hot water, you’ll want to add 2-3 oz of dish soap.
  3. Shake vigorously.
  4. Spray directly onto nest while the water is still hot.
  5. Run.

Stay mindful of your escape route. Once you apply the soapy water, it is likely that you will agitate the hornet nest and they may try to attack. You could also try mixing in other detergents that are around your home.

Benefits:

  • Safe for all occupants and pets.
  • Cheap and easy to make.
  • Likely, you already have all supplies.
How to Get Rid of Hornets Nest

2) Suck Them Up With A Vacuum

Another easy way to remove wasps are to suck them into your vacuum cleaner. Most homeowners have a vacuum in their home, making this a zero cost way to remove adult insects.

Simply use the attachment hose, get close to the nest and turn it on. This will suck the adult wasps into the vacuum, containing them in an area where they pose no risk to you. Of course, this means you have to be brave enough to get close to the nest.

Benefits:

  • Costs nothing.

Disadvantages:

  • Need to get close to the nest, and are more likely to get stung.
  • You still need to destroy the nest.

3) Set Up Traps

If you don’t want to go near a nest and risk getting stung, you should consider setting up a few traps. There are a variety of different traps that will work.

You will want to hang these traps in areas where you, your family and your guests are not going near.

These traps consist of sweet-smelling solutions so wasps and other pests go to it and end up getting stuck. You can purchase wasp nests or make your own if you want to make it a DIY project.

  • Glue Trap — Widely available online and at many retailers, this type of trap is covered in sticky adhesive that makes it difficult, if not entirely impossible, for wasps to fly away after they’ve landed on it. While an effective method, this type of trap is often criticized due to its ability to trap other insects and the slow nature in which they die.
  • Bait & Lure Trap — Another trap you can use is a bait and lure trap. There are many versions available, including a few you can make yourself, but they all essentially accomplish the same task: Use bait to lure a wasp into the trap, where they are unable to escape.

How to Make Your Own Wasp Trap

  1. Cut the top off of a plastic 2-liter bottle.
  2. Fill the bottom part with sugary water.
  3. Turn the top part upside down, with the bottle top pointing downward.
  4. This configuration makes it difficult for a wasp to fly out.

4) Spray Nest With Insecticide

If the above methods fail or you just prefer to start with a commercial insecticide, here are some general tips you should know before you buy.

  • Active Ingredient:

    It’s important that you get an pyrethrin or pyrethroid insecticide. The EPA has tested and determined that these “do not pose risk concerns for children or adults.”

  • Look Closely at the Label:

    The words on the label are important. If you’re trying to kill wasps or hornets, make sure to buy an insecticide that is specially formulated for these pests. These will typically have “WASP” prominently displayed.

  • Caution vs. Warning:

    Another important factor are the “signal words” on the label. Insecticides labeled with “Caution” are going to pose less of a risk to humans than those labeled with “Warning.” Either way, they’re both toxic. With this in mind, you should always exercise caution and take measures to protect yourself while using any insecticide.


Final Thoughts

Keep in mind: Simply knocking down a nest is not a complete solution. The remaining wasps will build a new one.

These are a few of the tips to get rid of wasps around your home. However, despite your best efforts, the day may come when you get stung. Clean the site immediately when this occurs. You may need to apply some antihistamine if it begins to hurt. In the event you have an allergic reaction to a wasp sting, you need to seek medical attention immediately.

Water Quality

How to Test the Quality of Your Drinking Water

The majority of homeowners in the United States get their drinking water from public water treatment facilities, and we tend to accept without question that the water that flows from our taps is clean and safe to drink.

But is it?

Americans use thousands of different chemicals every day. Unbeknownst to us, many of these substances ends up in our lakes, rivers and aquifers. These may include pesticides, pharmaceuticals, solvents, weed killers, cleaning agents, you name it — all of these contaminants eventually finds its way into our water supply.

How Does Our Water Become Contaminated?

The contaminants that degrade the water quality come from a number of sources. Some of it gets there from people dumping it down their toilets, while other chemicals show up thanks to runoff from farms or mining, leaching from landfills, or improper storage and disposal at manufacturing plants. In addition to the chemicals, many of our waterways are filled with harmful bacteria, such as E. coli.

Some of these contaminants get removed during sewage treatment procedures, but others find their way into the waterways around our homes. It’s up to our water treatment facilities to properly process the water, removing all toxins to make it safe for us to drink before piping it to our homes.

Water Contamination

Is Your Drinking Water Safe?

The Environmental Protection Agency regulates a number of harmful substances, such as uranium, lead, and arsenic. For each of these, the EPA sets a Maximum Contaminant Level indicating at what concentration these chemicals and minerals can exist in our drinking water before it is considered unsafe to drink.

Each summer, the EPA issues a report for most municipal water systems in the country. These Consumer Confidence Reports (CCR) can be searched on the EPA’s website.

In the CCR, at minimum you can expect to find the following information:

  • The source of your drinking water.
  • A discussion of the general risks of contamination.
  • A list of regulated contaminants and their levels in the water at the time of testing.
  • Possible health risks from these contaminants found in excess of EPA standards.
  • What your local water treatment facility is doing to correct any problems.

The Downside of the EPA’s Annual Water Quality Report

While these reports are a great resource that provide a high-level overview of what’s in the pipes in your home, they cannot reliably provide a complete picture of your water quality.

EPA Water

For the reports, water is tested only once or twice a year and contaminant levels are averaged out across 12 months. Contamination can occur outside of testing periods, or there can be occasional spikes in certain contaminants that exceed EPA regulations, and these issues may not be captured in the report. Furthermore, it’s possible for your water to become contaminated after it leaves the treatment facility.

Contaminants Not Measured by the EPA

As another point of concern, just a few of the chemicals that can be found in our drinking water are measured or regulated by the EPA. Independent water testing laboratories confirm a wide variety of contaminants that may be found in our water supplies. In water samples taken from across the country, these labs have discovered measurable quantities of contaminants as varied as antidepressant medications, artificial hormones and gasoline additives.

The EPA doesn’t regulate most of these chemicals in our drinking water. Although most will only occur in trace amounts, there’s no way to know what the chemical cocktail might be doing to our health. Most of these unmeasured contaminants have no taste or color and pass through our water and into our bodies undetected. While many of these substances may be harmless in and of themselves, there are few studies to suggest what these different chemicals might do in combination with others.


When Should You Get Your Water Tested?

The EPA recommends you test your water annually to get a sense for what you may be drinking and if there are changes over time. In addition to yearly water tests, some of the things that should prompt you to test your tap water immediately include:

Water Quality Testing
  • Recurring stomach or digestive issues: This may be a sign of bacterial contamination.
  • Cloudy, frothy, discolored or smelly water: This can be caused by a number of contaminants.
  • Living in an older home: Aging plumbing may leach copper and lead into the drinking water.
  • Red or rust-colored stains on your sink or clothing: This is a sign that your water has high levels of iron or other minerals.
  • Nearby coal, gas or agricultural activities, especially fracking: These industrial areas may lead to pesticides, herbicides or solvents leaching into your water.
  • Living close to landfills, gas stations, industrial plants, dry cleaners: Many substances can leach into the ground and, possibly, contaminate local water supplies.

For a more comprehensive list, the EPA offers this handy chart (PDF) that can help you determine when you might want to test your water, with symptoms that can occur with certain contaminants.


How to Find Out What’s in Your Water

If you’re experiencing any signs that indicate something could be in your water, or if you want to test your water for your own peace of mind, you have a few options to choose from. The cost and accuracy will vary, so it’s important to do some research on your options prior to investing.

Sending Samples to a Testing Lab

There are many professional water testing labs that can provide extensive testing on water samples you provide. They send you a kit and instructions on how to collect water samples, and then you send the samples to the lab for evaluation.

How to Test Water Quality

Generally you can choose which kinds of tests these labs will perform, from testing for common contaminants to specialized tests for radon, uranium or other substances depending on your location and personal concerns.

These labs provide tests for tap water from both water from city treatment plants and well water, so they’re a good option for the majority of homeowners. The least expensive tests run about $50 and the most extensive ones can cost over $400, so it’s a good idea to know what you’re looking for before purchasing a test kit.

Is a DIY Water Testing Kit Worth the Cost?

Those costs may seem exorbitant, and you do have other options. There are inexpensive home testing kits you can purchase from home improvement stores and online merchants. These kits purport to test for bacteria, lead, pesticides, chlorine, nitrates and nitrites, and can also tell you the hardness and pH of your water.

These kits may seem like a great way to check your water quality and identify potential problems, but they cannot test for all contaminants, including fluoride and glyphosate. They are also far less reliable than laboratory tests, so the results should be taken with a grain of salt.

Do These Types of Kits Even Work?

Good Housekeeping performed a review of different do-it-yourself home water testing kits. Their results showed that most of the common tests inaccurately measured levels of certain contaminants, while entirely missing others. Even worse, many of these tests have given false positives that may cause you to take expensive preventative action when no such need exists.

So, what should you do?

If you’re just curious about your water but have no serious concerns, trying out a DIY kit may be a good place to start. However, if you have any concerns about your water quality, or you have anyone with health issues, small children, or elderly family members, you should probably consider a professional testing lab.

Just be careful: There are some labs out there that offer “free” water testing, but those usually are fronts for companies that want to try to sell you expensive filtration solutions you don’t need. You can find some of these “free” options available near many Home Depot locations.

If you have evidence of contaminants in your water, you can report it to the EPA’s Safe Drinking Water Hotline, 1-800-426-4791.


How Can You Remove Contaminants?

For some contaminants, it’s easy to remove them with a filter that attaches directly to your faucet or by using a water pitcher filter.

These filters are inexpensive and easy to maintain, using activated charcoal as their primary filtration medium. They are perfect for removing chlorine (commonly added to disinfect municipal water). Depending on the manufacturer and freshness of the filter, they can also remove trace amounts of minerals such as zinc, lead, copper, and asbestos, as well as some bacteria or other biological contaminants.

Removing Lead from Drinking Water

Because of the significant health problems associated with consuming any levels of lead, if you’re concerned about the lead content in your water, be sure to do your homework. Most pitchers and faucet filters are not certified to remove lead from drinking water.

Reverse Osmosis System

Furthermore, a number of other contaminants cannot be removed with inexpensive filtration solutions. For safe removal of lead, pesticides, glyphosate, fluoride, and many other contaminants, a reverse osmosis filter might be the best solution. For many homeowners, the best choice will be a reverse osmosis filtration system that is installed directly under the kitchen sink, but you can also install a “whole-house” unit that works for the water in the entire home.

What is Reverse Osmosis?

Reverse osmosis is the process many bottlers use to produce ‘purified’ water, and this type of filtration will remove the majority of contaminants from your water. The downsides of these units include a high initial setup cost and a higher consumption of water as part of the filtration, which will increase utility bills.

Hopefully now that you’re armed with all of this information about water quality and filtration, you will be able to make an informed decision about when and why to get your water tested, as well as have some solutions if you find out you do have unwanted substances in your drinking water.

Garage Door

How to Insulate Your Garage (And Why Every Homeowner Should)

No matter what the weather is like outside, the temperature of your garage will typically follow the same temperature pattern. For the average homeowner, the garage is an area where temperature control can be a bit of a challenge.

The garage is well-known to be plagued by constant temperature fluctuations. Not only do these fluctuations have the potential to damage all the items you store in side, but it can wreak havok on your energy bills. Depending on the layout of your home, a poorly-insulated garage can ever have an affect on the temperature inside your home, especially within any rooms with a connecting wall to the garage.

So, what’s a homeowner to do? An easy solution is to add insulation to the garage door. Here’s why every homeowner should invest in this (relatively) cheap project.

Why You Should Insulate Your Garage

The most notable benefit of adding insulation in your garage is the ability to have better comfortable over the temperature. However, there are many other benefits you can expect from this easy DIY improvement.

One important benefit is the amount of energy you can potentially save. This can equate to a dramatic slash in your bills long after the insulation has been installed.

Another lesser-known benefit is that it can help create a sound-proof environment, keeping sounds out or in, depending on your situation. For example, if you live on a busy street, garage insulation can help quiet the loud noise of traffic. Or, perhaps, you are using your garage as a workshop or to learn to play the drums, insulation will help prevent that noise pollution from becoming an annoyance to your neighbors.


Areas You Can Add Insulation

Within your garage, you have three main areas in which you can add insulation. While it would be ideal to sure all three areas are properly insulated, it’s not always going to be feasible, as least not for the average homeowner.

1) Garage Door:

The easiest and cheapest area is to add insulation on your garage door. You can buy different types of insulation or buy a garage door insulation kit that has everything you need. Either way you go, this DIY project should only take a few hours to complete, and will save you thousands of dollars over the course of its lifetime.

As the main barrier to the exterior, adding insulation on your garage door is strongly recommended for every homeowner. This is especially true for anyone that has an interior wall connected to the garage.

2) Garage Walls:

Adding insulation to your garage walls is going to be a little more complex of a project. Likely, this is one area you shouldn’t need to be concerned about as homes, by law, are built with insulation in the walls. This is primarily due to the fire hazards associated with garages. Specifically, the type of combustible materials stored in the area, as well as the fact that most garages do not have a smoke detector.

Regardless, insulating the walls in your garage is something you should consider, especially when your home has an interior wall connected to it.

3) The Ceiling

The often forgotten about area in your garage, the ceiling is an incredibly important area to have insulation. If you have a bedroom directly above the garage, that room will experience the wrath of the weather outside if your garage does not have proper insulation.

Of course, adding insulation inside a ceiling is a very complex project that your average homeowner will be hesitant to embark on. You would need to consider the air flow and whether condensation may build up, which could lead to mold. This is definitely a job for a professional.

While installing insulation in the ceiling of your garage will certainly slash your energy bills and add comfort to the room above, it’s going to be significantly more expensive and time-consuming to complete and you may never fully see a return on your investment.


Types of Garage Door Insulation

Before you attempt this project, you should have a pretty good understanding of the different types of garage insulation available to you. While each of them will help you regulate the temperature and create a favorable environment within your garage, they do come with their own set of pros and cons.

1) Foam Boards:

Relatively cheap and easy to work with, foam boards are a stiff, firm insulation option that is a great choice for your garage door. Usually made from polystyrene, foam board insulation is easy to install, extremely lightweight and durable enough to handle extreme environments.

Available in large panels, foam board insulation is the easiest material for your average homeowner to work with. All you need is a measuring tape, box cutter, and an adhesive to adhere the board to the garage door. Out of all garage insulation options, this is the one that most homeowners will be interested in.

  • Ideal For: Installing on garage doors.

2) Batt Insulation:

Another cheap option that is easy to work with, batt insulation is going to be a great choice to install inside the walls and directly between studs. This type of insulation is typically made from fiberglass and available in precut sizes. It’s not the best choice for insulating your garage door, but can still be strategically used in this area.

  • Ideal For: Behind drywall, inside walls and ceilings.

3) Loose & Blown-In Insulation:

Often used within attics or between walls, this type of insulation is loose and, as the name suggests, blown into place. You can find this available in a variety of materials and is relatively cheap to buy and install. Because of the nature of how it is applied, you can fill the small crawlspaces, corners and crevices within your attic.

However, for your garage, this type of insulation may prove somewhat difficult to use.

  • Ideal For: Attics, crawlspaces and wall cavities.

4) Insulating Foam Sealant:

Another insulation option is spray foam, also called insulating foam sealant. This type of insulation is available in different forms. You can buy large quantities that work great for attics, or a small can of spray foam that work great at sealing the flow of air around windows or doors. For the purpose of insulating your garage door, we will only discuss insulating foam sealants available in small cans.

While a can of foam sealant is relatively cheap, these aren’t going to be the cheapest option for insulating a garage. These are best used to seal the flow of air around the edges of your garage door, or any other area that is hard to reach.

  • Ideal For: Small cracks, crevices and hard-to-reach areas.

Are Garage Door Insulation Kits Worth It?

This largely depends on your situation, the size of your garage door and how much time you’re willing to put into completing the project. For most homeowners, a garage door insulation kit is going to be the easiest option.

Featuring fiberglass or polystyrene panels, these kits will generally come with enough pre-cut panels to cover a garage door with a width of 9 ft. Equipped with pretty much everything you need, you can buy a garage insulation kit at a variety of retailers, including Home Depot, Lowes or Amazon. The cost of an insulation kit will range from about $70 to $100.

The Downside of Pre-Packaged Insulation Kits

The downside of buying a pre-made insulation kit is that they are all designed for the same size garage door in mind. This may leave you too much, or not enough, insulation to complete the project.

While this is an easy problem to resolve, nobody wants to pay for something that they don’t need. Or, be forced to make a second trip to the hardware store because you discovered at the tail-end of the insulation process that you don’t have enough materials to complete the job.


Do-It-Yourself Garage Door Insulation

While a garage door insulation kit is certainly a convenient option, you can often get better results by simply building our own kit. This is an easy DIY project that shouldn’t take more than a day.

It entails separately buying all the materials you’d find in a garage insulation kit, and then replicating your own insulation and putting in a little bit of work on your own. Customizing the insulation to fit your garage door ensures that you get maximum coverage, leading to increased savings and comfort.

How to Install Insulation on Your Garage Door

Below are some general tips you can follow to help you install insulation on your garage door.

Materials You Will Need:

  • Foam insulation panels
  • Box cutter or razor blade
  • Adhesive or glue

Installation Instructions:

  1. Measure Door & Calculate Material Needs — First, measure your garage door and calculate how much insulation you will need. Measure the dimensions of each panel on your garage door. Typically, these panels will be the same size, making it easy to calculate how much insulation you will need.
  2. Buy Materials — Next, head over to Lowes, Home Depot or your preferred hardware store and purchase the required insulation. While you’re there, you will also want to pick up some adhesive to glue the foam insulation to the garage door. Also, a box cutter, if you don’t already have one.
  3. Cut Foam Insulation to Size — Now that you know the dimensions for each panel on your garage door, cut the foam insulation to size. Repeat this step until you have cut enough insulation to cover the entire door.
  4. Adhere Insulation to Garage Door — Open your adhesive and start adhering your cut insulation to the door. If needed, you can use a little bit of masking or duct tape to help you hold each foam panel in place as the glue dries.
  5. Let Dry — Allow plenty of time to completely dry. The amount of time may differ depending on the type of adhesive you use. Generally, a few hours will be sufficient, but it may be wise to wait a full day to allow the adhesive to bond.
  6. *Optional: Apply Foam Sealant &mash; To really put the final touches on this project, you can use a can of foam sealant to help fill in any small gaps. This could include between the foam panels on the garage door, or even the small openings along the wall just inside the garage.

Please Note: The DIY option may cost a bit more in materials and time, but it’s well worth it in the long run.


Other Questions?

Thinking about adding insulation in your garage, but still have questions we didn’t address here? Or, perhaps, you’ve already completed this project and would like to add a few tips to help others?

Let’s hear it! Please contribute to the conversation by adding your questions, tips or concerns down in the comments below.