Portable AC Unit

9 Tips to Using a Portable Air Conditioner

How to Get the Most Out of Your Portable AC

Like any new appliance you bring into your home, a portable air conditioner requires a little bit of getting used to, plus the typical cleaning and maintenance to ensure it is operating to its full potential. Regardless of where you install it or how often you use it, getting to know your indoor air conditioner and how it works within each room its placed, will go a long way in helping you get the most out of it.

To help you learn how to use your portable air conditioner, we’ve but together the following tips. These tips are designed to help you increase its efficiency, longevity and overall cooling ability. For more technical info, please refer to our list of FAQs here, or the user manual that came with your portable AC.

1. Strategic Installation

Be mindful of where your portable AC is installed. While not always avoidable, there are certainly some areas of your home that you should try to stay away from when you’re installing your unit.

Portable Air Conditioner

Sunny Spots

If possible, you will want to try to avoid placing the portable AC in an area that gets a lot of afternoon sun. If the heat of the sun is bearing down on your AC, it will likely need to work harder to keep the room at your desired temperature. This extra work may eventually lead to a shorter lifespan.

Humid Spots

It’s also wise to install and use your air conditioning unit in rooms that have low humidity levels. This is because the higher the relative humidity is inside the room, and directly surrounding the AC unit, the more condensation it will create.

Depending on the type of portable air conditioner you are using, this extra condensation may increase the frequency that it needs to be drained and cleaned. Failing to remove this will, ultimately, lead to the unit malfunctioning.

2. The Amount of Space Between Walls

One of the main benefits of this type of air conditioner is the fact that it’s portable. This gives you quite a bit of flexibility in the location of your home that it can be installed.


However, it’s still important to pay close attention to where you place it.

No matter where you decide to install the appliance, it is very important that you leave adequate space between the walls and the unit itself. Failing to leave enough space will limit the airflow. When your unit is unable to draw in enough air while it is in use, its output is reduced. As a result, this reduced output makes it harder for your portable air conditioner to cool the room to your desired temperature.

Refer to the user manual to know how much space the manufacturer recommends for your specific model.

3. Ventilation

No matter what type of room air conditioner you are using in your home, ventilation is always going to be one of the most important factors for ensuring optimal operation and a long life of the appliance.

Window Vent Kit for Portable AC

The importance of ventilation cannot be overstated, but it’s especially important when it comes to portable air conditioners.

Proper ventilation will direct the hot air from the compressor and out of the room. This will help prevent your AC unit from overheating, as well as keep the temperature inside your room from going up.

Use the Right Vent Kit For Your Window

Most portable AC units come with a window ventilation kit that’s designed to fit the majority of “standard-sized windows” in homes. However, depending on when your home was built, as well as the region you live or the style of your home, the definition of a “standard-size window” will vary.

It is unlikely that you should have any issues getting your ventilation kit to fit the windows in your home, but if you do, there are other ventilation options available, including kits for sliding doors and drop ceilings.

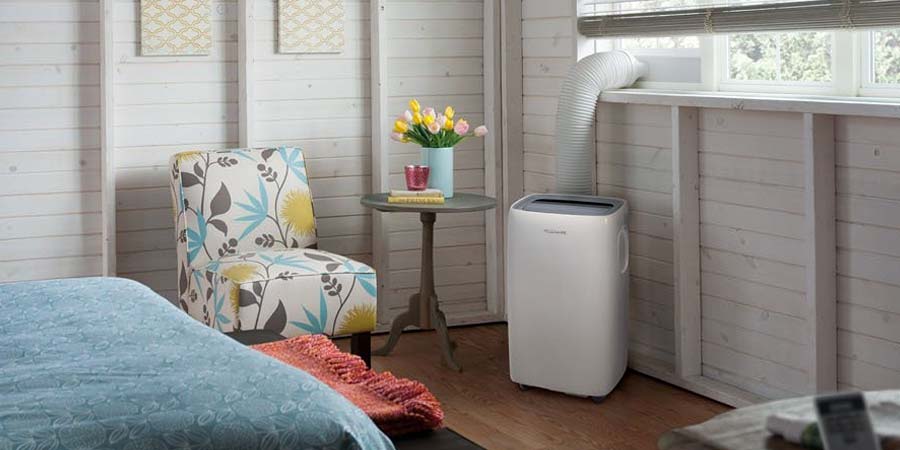
4. Keep the Exhaust Hose Straight

Now that we have ensured that the portable AC is properly ventilated, let’s now take a look at the exhaust hose. You will want to limit the amount of twists, kinks or coils in the hose leading from the unit to the window. The exhaust hose should remain straight with minimal contortions.

Portable Air Conditioning

How to Save Money With Portable AC’s

If you’re clever in how you use your portable air conditioner, they can save you a lot of money. Here’s how you can use them to lower your energy bills.

Learn How

It is strongly recommended that you minimize any kinks in the exhaust hose that will limit the airflow or reduce ventilation. This may require a shorter exhaust hose, or just simply being mindful of where/how it is installed.

What Happens If the Exhaust Hose is Twisted?

When you have a long and twisted exhaust hose attached to your portable air conditioner, the unit has a harder time with ventilation.

As a result, the moisture in the air being expelled will start to accumulate inside the hose, and eventually start to trickle back down into the unit itself. If this happens, the cooling efficiency and the lifespan of the air conditioner may be reduced.

5. Clean & Replace Filter Regularly

This is probably pretty obvious to all homeowners, but the filter in your air conditioner should be changed regularly. This is not only important to ensure proper operation and cooling, but is essential for maintaining your indoor air quality.

How Often Should I Change It?

The frequency that you clean or change your filter all depends on how often you use the AC unit. It would be wise to inspect it every 6 to 8 weeks, just to make sure that it is in good condition. If your home is dusty, or if someone in your family is prone to allergies, then you may want to consider cleaning or replacing your filter more often.


What Happens If I Don’t Change the Filter?

If you’re using a clogged or dirty air filter, it may reduce the intake of the unit which may lead to a variety of problems.

These problems include:
  • Diminishes the efficiency, costs more to use.
  • Harder to reach and maintain desired temperature.
  • Forces the AC unit to work harder than it should.
  • May compromise indoor air quality.

Many of these issues will only occur when the filter is neglected for an extended period of time, but nonetheless, this shows why it’s important for all homeowners to regularly check and replace the filters in their air conditioners.

What If My Portable AC Has Multiple Filters?

Depending on the brand and model of the portable AC you’re using in your home, you may have multiple filters inside. All portable AC units come with a pre-filter, and don’t always require the use of other filters.

While these pre-filters are great at reducing large particulates that may be circulating in your air, they do very little for the common allergens that are known to lead to health complications, such as mold spores or pet dander. This is why it’s recommended that you use another type of air filter in your portable air conditioner.

6. Keep it Clean

Keeping your portable air conditioner clean is one of the easiest ways you can keep the device working properly, and it doesn’t take much work to complete.

AC Coil Cleaner

The Simple Clean:

Simply wipe down the outside of the unit down with a damp cloth. Avoid using excessively hot water or any sort of cleaning chemicals that may damage the exterior.

How Often? Do this every 4-6 weeks.

The Deep Clean:

Unplug your unit and clean the condenser coils to increase its efficiency. You can either purchase a coil cleaner to use or make your own cleaning solution with water and lemon juice. Spray the solution on the coils and remove after a few minutes.

How Often? Do this once a year.

The Professional Clean:

Sometimes, even when you clean the unit on a regular basis, you may require professional service to improve its functionality. If you experience issues with your unit that you are unable to resolve on your own, don’t hesitate to contact a professional air conditioning service to clean and inspect the appliance.

How Often? As needed.

7. Store it Properly When Not In Use

When you have no plans on using your portable air conditioner, it is recommended that you store it away to keep it safe for the next season. Try to avoid storing your AC unit in an area that has extreme temperatures, such as the garage or patio.

Checklist for Storing Portable Air Conditioners

Before you disassemble your AC unit and put it away into storage, it is strongly recommended that you do the following tasks.

  • All water has been drained from the unit.
  • Turn unit on fan setting to help the inside dry completely.
  • Deep clean all other parts and allow to dry, specifically exhaust hoses and drain pains.
  • Compress the exhaust hose to prevent damage while in storage.
  • Cover the unit with a sheet to prevent dust or other debris from accumulating.
  • Store your portable AC indoors in a climate-controlled area.

8. Electrical Requirements

When it comes to the power source for portable air conditioners, most homeowners shouldn’t have any issues. The vast majority of these AC units are designed to operate on the standard 120v electrical outlets commonly found in homes.


This is a pretty essential feature, as it would be difficult to move the AC unit from room to room if it required a different receptacle.

It may be a good idea to use a surge protector that can add a layer of protection against sudden power failures. It’s also recommended that you are mindful of how many appliances are plugged into the outlet, as to not overwhelm the circuit.

Note: This applies to the majority of portable air conditioners used to cool rooms in your home. If you’re using a commercial-size unit or a high-BTU air conditioner, you may need more electricity. All electrical requirements will be found in the user manual.

9. Pre-Cooling & Better Circulation

To help your portable AC unit cool your down in an efficient manner, it is recommended that you turn it on shortly before the room gets too hot or uncomfortable. If you wait until the sun is shining bright and the temperature is at its peak, the air conditioner will need to work harder, and take longer, to reach your desired temperature.

Another tip that every homeowner should know, is to use a small oscillating fan near the unit. This will help the cool air circulate throughout the room, and make you feel more comfortable.


Final Thoughts

There are many benefits that come from a portable air conditioner, but when you know how to strategically use it, you’ll find that you can improve its efficiency and extend its life.

By following the usage and maintenance tips listed above, you put yourself in the position to get the most from your AC unit, all while staying cool and saving money.

Kale

How to Make Kale Chips (With Recipes & Flavoring Tips)

We hear about many food crazes and diets all the time. Let’s face it. Every time a new food is introduced to the world, restaurants, food critics, television chefs and celebrities go out of their way to talk about the food as they try to show us the infinite possibilities there are for turning an otherwise boring ingredient into something special.

That’s probably the case with kale.

A few years ago, no one ever talked about this green leafy vegetable. Now you see it everywhere. High-end restaurants are finding ways to elevate it from its former role as a garnish on food trays and salad bars. Grocery stores are selling packaged salads that use kale, bags of washed kale, and bunches of kale. It’s even on the shelves of Walmart Supercenters and other discount stores. It’s also become a critical addition to the growing movement that encourages embracing ingredients that go from the farm to your table.

According to a May 2014 news report from Bloomberg, between 2007 and 2012, the number of farms that grow kale in the United States has more than doubled.

How Did Kale Become So Popular?

It’s long been known that kale is healthy for you. But, the popularity of the cruciferous vegetable has skyrocketed in recent years. The story behind this rise is a curious tale.

Fresh Kale

As the story goes, in the year 2013, a New York PR agent and self-proclaimed “punk-at-heart,” Oberon Sinclair, concocted a scheme to get people to believe that the American Kale Association hired a publicist to help desperate farmers who were growing kale while spreading the word about this dark green cruciferous vegetable throughout New York City.

After all, when you want to turn something into a trend, you go to New York to announce it to the world, right?

It’s hard to know whether people believed this story because let’s face it, no self-respecting foodie would ever admit that they’d been conned into believing that the American Kale Association (AKA) launched a campaign to promote the wonders of kale. Especially considering that the American Kale Association did not exist when Sinclair launched her campaign.

Whether or not the American Kale Association actually existed at that particular time, has become somewhat of a moot point. It exists now, and has carried on with the original “kale-awareness” campaign.

However, it must be noted that prior to the curious PR campaign launched by Sinclair, there was another organization already on this precise mission. Founded one year before the curious PR campaign referenced above, the National Kale Day Organization was created with the same vision: To educate people about the nutritional value of kale and helping people learn about different ways to cook, use and eat it.

Cruciferous vegetables are healthy. They are full of vital nutrients. Variety is also good. So if you’re looking for a way to add variety to your diet, include more healthy leafy greens, and eat more vegetables, you might want to consider trying kale. Raw kale can be bitter. But there are other ways to use it. It’s a delicious addition to soup, and if you’re used to sauteing spinach, Swiss chard, mustard, turnip or collard greens, you can add kale to your gustatory library.


Bunch of Kale

How to Select the Best Kale

Before you start the process of making kale chips, you have to buy the vegetable itself. You have a few options to choose from.

Fresh & Raw

You can find fresh bunches of kale in the produce section, typically stocked alongside other cruciferous vegetables, such as spinach, broccoli, lettuce and cauliflower. The key is to get a bunch of kale where all the leaves are dark green and crisp looking.

Starting at the end of summer through winter, you’ll notice the selection and overall price of kale become more competitive, as they are in season.

Organic & Locally-Grown:

If possible, try to buy organic kale that is locally-grown. The Environmental Working Group includes kale on its list of produce items that contain pesticide residue.

Bagged Kale:

If you’re short on time, bagged kale is a good option. Already chopped and washed, the bagged option will save you time. However, this added convenience comes with its own set of pros and cons. Not only do the bags tend to be more expensive, you also sacrifice the ability to hand-pick the bunches you believe would be the best.


How to Prepare Your Kale

Now that you have the kale bought and ready to go, it’s time to prep.

Cleaning:

Before you start, it is strongly recommended that you thoroughly wash all of your produce before cooking with or consuming. This is especially true with kale, as the leaves are often covered with dirt and other loose materials.

Kale

Remove Stems:

Use a herb stripper (if you have one) to remove the stems. Don’t skip this step. Kale stems are tough, and they’ll take much longer to cook. You’ll risk burning your kale leaves if you don’t remove the thick stems.

Tear the Leaves:

Tear each leaf into pieces. The size of your pieces should be comparable to that of a potato chip or tortilla chip. Don’t go to a lot of trouble to make sure that each piece you tear is the same size. That’s not necessary.

Remove Excess Water:

Now that your kale leaves have been torn into smaller chip-size pieces, you’ll want to remove the excess water. A salad spinner is a fantastic tool to help you with this. If you don’t have a salad spinner, give each piece a little shake and the water will roll off.


How to Bake Kale in the Oven

You’ll want to lay your kale pieces in a single layer on a flat baking sheet. If you intend to add salt, spices or herbs for flavor, a small amount of oil will catch the seasoning. Fill a half a tablespoon with extra virgin olive oil. Spread it on the baking sheet and rub each torn piece of kale into the oil, making sure to massage the oil into both sides.

Some recipes recommend using coconut oil. For kale chips, since you’ll be baking them in an oven that’s moderately hot, you won’t have to worry about whether the oil is safe for high heat.

If you line your baking sheet with a piece of parchment, clean up will be easier. You also won’t have to worry about whether anything sticks to the pan.

You don’t have to use a dehydrator to make kale chips. The oven is a fantastic alternative because you can turn the baking sheet during the drying and baking process.


– Advertising –

Recipes recommend oven temperatures but expect to adjust the temperature because of variations in different oven brands and heating methods. Turn the baking sheet periodically during the cooking process to make sure that every piece of kale cooks evenly.

Supplies & Ingredients You’ll Need:

  • Parchment Paper
  • An oven thermometer
  • Baking Sheets
  • Herb stripper or sharp knife to remove tough stems
  • Colander and Salad Spinner
  • Large bowl
  • High quality unrefined and unprocessed oil
  • Sea salt

Tips to Baking Kale Chips:

  1. Be sure you get rid of all of the loose dirt on every kale leaf. Consider using a commercial vegetable cleaning spray to help you remove excess chemical residues and grime.
  2. When you tear up your kale leaves into chip size pieces, take time to tear each leaf so that you remove the woody stem that goes through the center of the leaves. Getting rid of every part of the hard stalks will ensure that every piece of kale gets thoroughly cooked.

Be sure you put your oven thermometer in the oven before turning it on to preheat it.

Don’t get discouraged if you don’t make a perfect batch of kale chips the first time. There are often huge variations in cooking times and temperatures depending on the type of oven you’re using, your location and other environmental circumstances. Consequently, you may need to make several batches of chips before you figure out what oven temperature and the length of time it takes to get your chips as crisp as you like them.

Another thing to consider is that you may want to bake your kale pieces at a lower temperature if you’re topping your chips with herbs, seasonings or other flavorings. A lower oven temperature will force you to keep the chips in the oven longer to get them to the desired crispiness. It may also be effective at infusing your chips with more of the flavor you’re adding to them, thereby allowing you to create an unusual, creative, and flavor-packed snack treat.


Kale Chips

A Starter Recipe for Kale Chips

As you’ll soon find out, there is no limit to the flavor combinations that you can come up with to make your own healthy and delicious kale chips. Regardless of the flavors you add, there are two essential ingredients you’ll need to use no matter what else you decide to add.

You’ll need to add some salt to the kale because the salt is critical to drawing excess water out of the kale leaves. You’ll also need to use some type of high-quality extra virgin, first cold-pressed oil. Since you aren’t going to be baking the chips in a hot oven, you can use any kind of oil that tolerates low-to-medium heat. The first cold-pressed Extra Virgin Olive Oil is probably the most common type of oil used for making homemade vegetable chips. Grapeseed, unrefined sesame or coconut oils are also options.

How to Make Flavored Kale Chips

There are all sorts of flavors and flavor combinations you can use to create different variations on the traditional kale chip.

How to Make Kale Chips

Regardless of the ingredients with which you intend to flavor your chips, don’t forget that you’ll need to use a small amount of oil as a way of ensuring that each piece of kale gets evenly coated with the herb, spice, condiment or flavor.

Unless you want your kale chips to absorb the flavor of the oil you’re using, you will want to use the purest, mildest, and least flavorful oil you can. Also, remember that temperature isn’t a concern since you’ll be cooking your flavored chips at a lower temperature than you use for the plain chips.

Flavor Combinations to Spice Up Your Kale

If you’re used to snacking on corn or potato chips and have a favorite variety, there’s no reason you can’t try to replicate the taste of that chip on kale. The result will be a healthier version of a snack treat you already like.

1. Salt and Vinegar

This may be a tricky taste combination to try to use with kale. Oil is necessary to get the salt to stick to the kale pieces. If you try to use oil and vinegar, you may wind up with something that tastes more like a wilted salad that’s dressed with oil and vinegar dressing.


– Advertising –
How to Add Flavor:

To make this flavor combination work, try soaking your kale leaves in the vinegar for a few minutes. That short “soak” will give your kale the necessary infusion of vinegar for the taste combination that’s so popular with potato chips. You’ll still need to coat each piece of kale with the salt and oil mixture.

Baking Instructions:
  1. Lay the coated pieces of kale on a parchment paper-lined baking sheet. Don’t let any of the pieces touch or overlap.
  2. Cook the chips at a low temperature of around 250-275 degrees.
  3. Bake the chips for 25 minutes and check them to see if they are drying out and getting crisp.
  4. You may need to rotate your baking sheets every 25 minutes or so to make sure that every chip cooks evenly.

Keep checking on the baking sheets to make sure that nothing is burning. Once you’re sure that the chips are fully cooked, remove them from the oven. You can leave them on the baking sheet to cool. As they cool, you’ll see that they become even crispier.

Dehydrated Onion Flakes:

Dehydrated onion flakes are easy to find in the spice section of your favorite grocery store. If you love the taste of onion, and would like to add that flavor to your kale chips, dehydrated onion flakes are going to be a great option for you. Plus, give your kale chips an extra crunch.

Follow the instructions listed above for removing the thick stems on each leaf. Then tear all of the leaves into chip-size pieces.

How to Add Flavor:

Add a couple of tablespoons of high-quality extra-virgin “First Cold” pressed olive oil to a large bowl. Add enough onion flakes to cover all of the kale pieces evenly. Use your hands to massage the oil and onion flake mixture into the bowl full of torn kale leaves.

Baking Instructions:
  1. Line your baking sheets with pieces of parchment paper.
  2. Preheat your oven to 250 degrees.
  3. Carefully lay all of the kale pieces out on the baking sheets, making sure that there is space between each piece.
Plate of Kale

Because you’re baking your kale chips at a lower oven temperature to allow the oil and onion flake flavors penetrate each of the kale pieces, you will need to cook your chips for twice as long as it takes to make kale chips with no added flavoring.

Garlic or Onion-Powder:

If you ever make popcorn at home, you may have learned about the delicious taste of garlic and onion-flavored popcorn. Garlic and onion powder are also excellent flavor enhancers to add to kale chips. This is especially true for anyone looking to introduce finicky family members to a healthier alternative to calorie and salt-laden junk food.

Adding Flavor & Baking Instructions:
  1. Add a couple of tablespoons of olive oil to a large bowl.
  2. Add your kale pieces and use your hands to make sure that every kale piece is evenly coated with the olive oil.
  3. Arrange the kale pieces so that every piece lays flat on the parchment-lined baking sheet.
  4. Sprinkle your garlic or onion powder, or a little of each over the entire baking sheet, making sure that an even coat of powder covers every piece of kale.
  5. Place your baking sheets into a preheated 250-degree oven.
  6. Set an oven timer for 25 minutes.
  7. Rotate the baking sheets to ensure that all of your chips get as crisp as you like them.

Other Spices, Additives & Flavor-Enhancers

Here are a few more options for adding flavor and spices to your homemade kale chips.

  • Sriracha — If you like to add heat to your food, you might want to brush your kale chips with Sriracha sauce before you bake them.
  • Red Pepper Flakes — These add zesty heat and will stick to kale leaves that are coated with oil.
  • Chili & Taco Seasoning — This will give your kale chips a bit of spicy Mexican flavor.
  • Smokey — For an added smokey taste, consider sprinkling ground chipotle peppers or smoked paprika over your oil-coated kale pieces.
  • BBQ — If you like the taste of barbecue-flavored chips, sprinkle your oil-rubbed kale pieces with a barbecue spice mixture or dry rub.
  • Parmesan Cheese — For a cheesy taste, sprinkle grated Parmesan cheese over oil-covered kale pieces.
  • Brewer’s Yeast — This tastes great on popcorn. Capture that distinctive taste by sprinkling an even coating of brewer’s yeast over oil-saturated kale leaves.
  • Chocolate — If you’re the total chocoholic and go to every extreme to get your chocolate fix, consider sprinkling grated chocolate on oil-covered kale leaves. Use a mild or flavorless oil like coconut oil, so the oil doesn’t overpower the additive. You can use bittersweet chocolate to give your kale chips a savory chocolatey taste.

Final Thoughts To Keep In Mind

Here’s a few parting thoughts to keep in mind as you try your hand at homemade kale chips.

  • Be sure you have fresh, crisp kale leaves. If you’re buying kale by the bunch, be certain you remove the thick, hard stems and massage all of the leaves as you wash them. Use your hands to remove embedded sand, dirt and debris. This may seem like a time-consuming process, but your kale chips will be inedible unless you remove all of the ground in dirt.
  • Use a cooking timer to remind you to check on the progress of your chips. An oven thermometer allows you to monitor your oven temperature to ensure that it is consistent. Some electric ovens have less than consistent thermostats.
  • Don’t try to bake all of your chips at once. Use one oven rack. If your rack only holds one or two baking sheets at once, plan to cook your chips in batches.
  • Don’t prepare your kale leaves until you’re going to cook them. Kale is full of water, and it wilts and gets soggy very quickly.

Kale is a fantastically healthy and inexpensive fall and winter vegetable. It’s also fun to create new chip recipes by adding herbs, seasonings, and other flavor enhancers so you can enjoy different versions of your newfound healthy snack treat. Pack a bag full of kale chips to take to work or to add to your children’s school lunches.

Beaucarnea recurvata

How to Grow a Ponytail Palm

As one of the most popular houseplants found in homes all around the world, the Ponytail Palm (Beaucarnea recurvata) is one of the easiest to grow and require very little maintenance by their owners. If you’re looking to add a splash of charm into your home, but don’t want to put much time or thought into it, then this tropical houseplant may just be the perfect choice for you.

Originating from the arid landscapes of Mexico, the name Ponytail “palm” is a bit of a misnomer. While the bulbous trunk indeed had some similarities to the trunks of other palm trees, the Beaucarnea recurvata is actually a drought-resistant succulent. And that bulbous trunk is where the plant stores its water.

Ponytail Palm

How to Care for Ponytail Palm

Ponytail palms are one of the easiest houseplants to care for.

They require little water, love lots of light, you don’t have to fertilize often, and they have the ability to adapt to the comfortable temperatures often found in homes. The downside of growing a ponytail palm inside your home is the incredible slow pace in which they grow.

As long as you don’t over-water it, you probably won’t kill it. It’s pretty much that simple.

However, if you want your plant to grow tall, thrive and be healthy, there are some easy guidelines you can follow to help you provide the best care for your ponytail palm.

Botanical Info

Latin Name Beaucarnea recurvata
Plant Family Asparagaceae
Genus Beaucarnea
Common Names Ponytail Palm, Elephant Foot Palm, Bottle Palm, Nolina Palm
Origin Mexico, South America
USDA Zone 10 – 11

Growing Conditions

Water Once every ~10 days.
Light Bright & full exposure to sun.
Soil Cactus potting soil.
Fertilize Once a month. Diluted liquid fertilizer.
Temperature Warm. Keep above 55°F.  
Humidity Adaptable. Not too low.  
Maintenance Easy to care for.  
Grow Inside? Yes
Grow Outside? Yes. Best in USDA Zone 10 – 11
Safe for Pets? Yes. But, care should be taken.
Container Size Depends on how large you want it to grow.  

7 Common Questions About Ponytail Palms

To help ensure that you’re providing to proper care for your ponytail palm, we have listed out the most frequently asked questions down below. If you have a question that you don’t see listed or would like to add additional feedback for others to learn from, please leave it down in the comment section below.

1. How often do you water a ponytail palm?

Not often, but the frequency depends largely on the environment you’re growing it in. Below, we have some general guidelines to watering a ponytail palm, but the best advice is to give it a drink of water when you see the soil start to dry.

  • During Hotter Months — You’ll want to water your ponytail palm plant once every 7-10 days.
  • During Cooler Months — You’ll want to slow down the watering schedule to once every 20-30 days.

If you don’t abide to that precise schedule, don’t fret. This plant is great at surviving long periods without water. But, if you want a healthy plant that grows to its fullest, you should try to follow the watering guidelines listed above.

Remember: The easiest way to kill a ponytail palm is by over-watering. Less is more.


2. How much light does it need?

Ponytail palms love lots of light. Remember, this plant is native to arid deserts, so full exposure to the sun will be appreciated by this plant. However, while full exposure is recommended, ponytail palms are adaptable to little or moderate amounts of light.

The downside of less light exposure is that you’ll see a noticeable slow down in its growth. And for an already slow-growing houseplant, this may just completely stunt it.

So, if you want your ponytail palm to grow tall, give it lots of light.

3. How often should I fertilize a ponytail palm?

Depends on the season and environment you’re growing your ponytail plant in. A general guideline is to fertilize your plant once every 3 or 4 weeks. If you see the tips of the leaves start to turn brown, then you’re using too much fertilizer.

  • Spring & Summer — Add fertilizer once every 2 or 3 weeks.
  • Fall & Winter — Add fertilizer once every 4 to 6 weeks.

Adding fertilizer is essential to the overall health of houseplants, and Beaucarnea recurvata is no different. Liquid fertilizers are recommended for ponytail palms, but granular fertilizers will also suffice. An all-purpose fertilizer will work fine here, but you can also consider using one formulated for cactus and other succulents.

4. What kind of soil should I use?

The best type of soil for this plant is one that drains quickly. Unlike many popular tropical houseplants, the last thing the ponytail palm wants is to sit around in moist soil for an extended period of time.

When you repot or transplant, it is recommended that you use a soil designed for cactus or succulents. If you want to make your own soil mixture, keep it light on the amount of peat you use within.

Remember: Keep the soil dry, and water sparingly.

5. Is repotting possible with a ponytail palm?

Yes, repotting a ponytail palm is possible and easy to do, but precautions should be made before you undertake this effort.

  • Size Matters — First, consider how large the tree is, and where you’re going to be moving it to. Larger plants will likely require more help from others, as well as a few other tools or equipment to assist in the transplant. On the flip side, if you’re repotting a small bonsai ponytail palm, then you likely won’t need any help or special tools.
  • Do In Spring — It is recommended that repot your ponytail palm early in the growing season, as this gives it plenty of time to adjust to the larger pot and form strong roots.
  • Examine the Roots — Once you have it out of the original container, take a close look at the roots of your plant. Look for any signs of bugs, rotted areas, or anything that looks injured or contaminated. Cut these off before you repot in new container.

Keep in mind: Transplanting it to a larger pot will encourage the plant to grow larger. This may be a deal-breaker for anyone growing a bonsai palm.

6. Is this plant safe for pets?

According to the ASPCA, the ponytail palm does not pose any toxicity threats to dogs or cats.

However, every homeowner with pets should know, and possibly take precautions if deemed necessary, that the leaves of the Beaucarnea recurvata contain saponin which may cause discomfort in some animals if ingested. So, while it’s unlikely that any harm will come to your dog or cat, it may be wise to keep an eye on them and ensure that they are not eating or chewing on the leaves.

It’s also worth noting that saponins are found in many popular houseplants, not just the ponytail palm. They also pose no danger to humans. In fact, saponin is found in many dietary supplements and are suggested to have some nutritional benefits.

7. Can you grow a ponytail palm outside?

Yes, but it’s recommended that you live in USDA Plant Hardiness Zone 10 or 11 if you want your plant to thrive. The sandy soil and hotter temperatures create an ideal environment for growing the ponytail palm outside.


Broken CFL Bulb

How to Clean Up a Broken CFL Bulb

Using compact fluorescent light (CFL) bulbs in your house is a great way to use less energy, save a little bit of money on your utility bills and help protect the environment.

However, breaking one of these bulbs, as simple as it may seem, can create a dangerous situation. Because of the trace amounts of mercury inside the bulb, it’s important that you take proper precautions if you ever find yourself having to clean up a broken one.

Is a Broken CFL Bulb Dangerous?

Yes, it can be a potential safety concern. The tiny shards of glass that come from the broken bulb can easily cut open your skin.

But, that’s probably not why you’re reading this. I’m willing to guess that you’re concerned about the small amounts of mercury inside of a CFL bulb, and, perhaps, what it’s going to do to your indoor air quality. This is a valid concern.


Is There Mercury In CFL Bulbs?

Yes. It’s true that CFL bulbs have mercury inside them. And yes, if one of these bulbs break open inside your home, your indoor air quality could deteriorate if you don’t take proper precautions.

However, this scenario is much like many other emergency-like situations that homeowners often face. When something goes wrong, you take action before it gets worse. It’s simple.

Let’s look at the science:
  • Study from 2008: CFL bulbs tested contained about 3-5 mg of mercury, but the energy savings of each bulb prevents about 4.5 mg of mercury from being emitted into the air by power plants. Interestingly, this study also found that CFL bulbs contain about 1% of the mercury as old thermostats (500 mg).
  • Study from 2011: CFL bulbs tested only contained 0.1 to 3.6 mg of mercury, and would take up to ten weeks to emit vapors that would be considered hazardous to human health.
  • Study from 2012: Concluded that young infants were at the highest risk, and clean-up within the first four hours after a bulb breaks is “critical.” The study also noted that the temperature and ventilation of the room play a big role in whether the air is safe to breathe.

So, yes… A broken CFL bulb can be dangerous, especially for younger kids. But the danger can be minimized if you act quickly and follow a proper cleanup process.

For more information about the dangers of mercury, please visit the EPA’s website.


How to Clean Up Broken CFL Bulb

Cleaning up a broken CFL bulb isn’t a difficult or harrowing task. It’s a rather simple process that doesn’t require a professional and can be completed within a few minutes. However, because CFL bulbs contain mercury, the process for cleaning it up is a bit more complicated than simply picking up glass.

Below, we have explained the process you should follow if you break a CFL bulb, as well as some general tips that every homeowner should know before they start.

How to Clean a Broken CFL Bulb

Gather Your Materials:

  • Cardboard, heavy-duty paper or plastic scoop.
  • Tape, damp paper towels, or cleaning wipes.
  • Plastic bag or glass jar with lid.

Procedure for Clean-Up:

  1. First, use your cardboard or stiff paper to scoop-up the large pieces of the broken CFL glass.
  2. Next, use tape or damp paper towels to help remove the smaller shards of glass.
  3. Continue previous step until you feel confident that all glass shards have been removed.
  4. Wipe area with disinfectant wipes.
  5. Put all materials into your bag or glass jar, and seal completely.
  6. Dispose immediately.

Note: A glass jar with a tight fitting metal lid is the best item to dispose of the broken shards of glass because it keeps the mercury vapor sealed inside.

If one is not available, a sealable plastic bag, such as a large ziploc bag, will suffice. However, if you go this route, try to handle it as little as possible. You may also want to wear disposable gloves or gloves you don’t mind throwing away in order to prevent the glass shards from cutting your hands.


General Tips Every Homeowner Should Know

Know that you have a better understanding of how to clean up a broken CFL bulb, let’s take a closer look at a few other factors that will help protect you from the mercury inside.

1) Shut Off Central AC

The first step is to turn off your air conditioner, heater, fans or any other appliance that circulates air throughout your home.

The goal with this first step is to prevent the air in the “zone” with the broken bulb from spreading throughout your home. If the area has been exposed to elemental mercury, than it is important that you prevent the air from dissipating to other areas of your home.

2) Air Out & Ventilate Room

Now that you’ve shut off all air conditioners in the room, open the windows and allow the room to “air out” a bit. As noted in the studies above, a well-ventilated room is an important step to limit your exposure.

It would be wise to instruct all people and pets to leave the room immediately, taking precautions to avoid the area where the bulb was broken. Once everyone has left the room, you should open windows, doors and vents to the outside, but not into the house. Use this time to gather your materials.

CFL Bulb

3) Clean Up Within Four Hours

Allowing the mercury to sit, undisturbed, in a room with no ventilation is extremely unsafe and will quickly degrade the indoor air quality of your home. If you’re using an air conditioner, no matter what kind it may be, turn it off.

As the study above concluded, the first four hours are the most important. Try to clean it up within that time frame.

You have absolutely nothing to gain by waiting.

4) Safely Collect & Seal Debris

After you’ve gathered what you need, re-enter the room where the CFL bulb was broken. Leave the windows, vents and doors to the outside open in order to continue to let the mercury vapor dissipate.

Scoop up the larger pieces of glass from the floor. Place the shards into the glass jar or ziploc bag. Use the tape to pick up the smaller pieces of glass. Make sure that all glass is removed from the hard surface or carpet.

Once the glass has been picked up and placed in the jar, use the damp paper towels to clean the affected area. Disposable disinfectant towels will also be good for this purpose. All of these wet wipes should be placed inside the jar or ziploc bag. If you wear disposable gloves while cleaning up the mess, those too should be discarded inside the container

Once this has all be completed, tightly seal the jar or ziploc bag.

5) Remove From Home Immediately

Now that the broken bulb has been picked up, remove it from the house immediately. This is especially important if you used a plastic bag. This is because the plastic may not completely contain the mercury vapor inside. If not, it may then leak out into the air inside your home.

6) Never Use a Vacuum Cleaner. Ever.

Trying to vacuum up the glass from a broken bulb will only further fan the mercury vapor into the air. This is exactly what you want to avoid. Contain, not circulate.

Of course, depending on the type of floors that the broken bulb is on, this is easier said than done. Below, we have listed out some tips for cleanup based on the type of flooring.

  • Hardwood & Tiled Floors — It would be avoid the vacuum cleaner entirely. Stick with using a steam mop, swiffer or wet wipes to clean up the tiny shards of glass.
  • Carpets & Rugs — On a carpeted area, it can be difficult to find all the smaller pieces of glass from a broken bulb. Vacuuming can help, but it should be done with windows open and entry ways into the rest of the house closed.


No matter what type of flooring you have, once you completed the cleanup process listed above and picked up as much of the broken bulb as possible, you will be able to then — and only then — use the vacuum cleaner.

Note: If you decide to use the vacuum cleaner, it would be wise to use the hose attachment, keep the area well-ventilated and dispose of the bag / empty the canister as soon as possible. You don’t want CFL debris sitting inside your vacuum cleaner for an extended period of time.

7) Always Wash Your Hands Immediately After

Even if you wear gloves when you clean up the broken bulb, there is no guarantee that mercury didn’t get onto your hands. After cleaning up the shards of glass and throwing all the debris away in the best possible way, thoroughly wash your hands with soap and hot water.

This will help remove any small pieces of glass that may be lingering on your hands. It will also give you more peace of mind about residual mercury.

8) Dispose Hazardous Waste Correctly

Check your local regulations for the best way to properly dispose of broken CFL’s. Some municipalities may require you to dispose of the hazardous waste in different manners. Some simply allow you to throw it out with your garbage.

Of course, you could always toss it out and know one would ever know. But, you don’t want to inadvertently contaminate another area of our community. So, be a good neighbor, follow the law and dispose accordingly.


Summary

Cleanup of any broken CFL bulbs should be prompt and precise. Shut off your air conditioner to prevent circulation of air. Open windows to ventilate air in the area. Never, ever use a vacuum cleaner. And, seal the broken shards in bag or jar and remove from your home as soon as possible.

Garbage Disposal

Garbage Disposal FAQs

What is a garbage disposal?

A garbage disposal is a motorized appliance installed underneath your sink that allows you to finely grind food waste into small particles that can be safely disposed of down your drain.

Common names include:

  • Waste disposal unit
  • Garbage disposer
  • Garburator
  • Insinkerator (popular brand)

How do garbage disposals work?

A garbage disposal is really just a simple demonstration of Isaac Newton’s laws of motion.

Garbage Disposal Diagram

The moment you turn on your disposal, a small plate at the bottom of the “grinding chamber” starts to rotate at high velocity.

On this plate, you will find two impellers. These are essential components, as they help create the necessary centrifugal force that propels the scraps of food against the internal wall of the chamber. This wall grinds the food down into tiny particles that can flow down the drain.

Contrary to popular belief, most homeowners believe that a garbage disposal works much like a blender. While they indeed have many similarities, this is factually incorrect. There is no chopping, cutting or chewing involved in the process. In fact, a garbage disposal doesn’t even have blades!

This animation provides a great visual explanation of how a disposal works.


What size garbage disposal do I need?

This is a question with an impossible answer. Every homeowner will have different needs based on their unique situation.

To find the right size disposal for your home, you should first consider how much power you will need. This can be determined by considering a few factors.

  • How many people live in your home?
  • How often will you be using the disposal?
  • What kind of food do you currently prepare, and how much waste does it create?

Common Sizes:

  • 1/3 horsepower
  • 1/2 horsepower
  • 3/4 horsepower
  • 1 horsepower
  • 2+ horsepower

Generally, the more people in your home, the more often you’ll be using the disposal, thus the more power (or larger size) you’ll need.

However, you should also consider the types of food waste that you’ll be putting in the disposal, as well as the volume you think you’ll create.

Note: When it comes to garbage disposals, the term “size” refers to power, not the actual dimensions of the unit. Another important consideration, but one that is unlikely to affect your buying decision, but does play a role in the installation.


What items can you put in garbage disposal?

This is a great question that more homeowners should be asking. A common misconception is that anything and everything can go down a garbage disposal. In reality, there are a number of items that should never be put down a disposal. This includes the scraps of many popular foods.


Never put these in disposal:

  • Cooking oil / grease
  • Stringy fruits and veggies
  • Pasta
  • Rice
  • Beans
  • Coffee grounds
  • Eggshells

Note: If you have a large, powerful garbage disposal from a reputable brand, then some of the items listed above would likely be okay to put into the unit. However, to prevent possible problems and ensure your garbage disposal has the longest life, it is recommended that you avoid the items above.


Why does my disposal smell?

There is likely food waste inside the grinding chamber that is starting to rot. It may be that you didn’t grind your last batch long enough, or perhaps there is food stuck inside the unit or not flushed down the drain properly.

To eliminate these odors, you should run plenty of cold water into the unit and turn it on. Allow it to fully grind and flush all items inside the chamber. Next, you should thoroughly clean your disposal to eliminate all bacteria that may be lingering and contributing to the odor.


What’s the difference between continuous & batch feed?

These are the two types of disposals you will choose from. Here is a general summary that highlights the differences between the two.

  • Continuous Feed:

    The most common type of disposer found in homes, these are considered to be effortless and simple to use. All you do is turn on the cold water, flip the power switch and add your food scraps. You can continue to let the unit run until all food waste has been grinded and disposed.

  • Batch Feed:

    Slightly more difficult to use, this type of disposer only allows you to grind food in smaller batches. In order for these to work, you must use a stopper to activate the power. Without the stopper, the device will not work. While they require a bit more work, they are considered to be the safer option.

Which one is better?

This is entirely dependent on your situation. Like most appliances, they each come with their own set of pros and cons.


Do you need to run water when using a garbage disposal?

Yes. It is recommended that you run the water while you operate the disposal. This will not only help the device grind your food waste, but also guide the small particles down the drain and prevent potential problems, such as a clog in your pipes or within the disposal.

  • Cold Water:

    When you are grinding food waste, you should always use cold water. This will prevent the fats within your food from liquefying, which may create a clog when the temperature cools and these fats once again solidify. By running cold water, you keep these fats in a “solid” state, which makes it easier to grind and eliminate.

  • Hot Water:

    When you are cleaning your disposal, you can use hot water. However, this is dependent on how you are cleaning it. If you are using cleaners, such as vinegar, baking soda or citric acid, hot water will be fine, perhaps even helpful. However, if you are grinding food — such as citrus peels — to help clean the disposal, then you should stick with cold water.


How do you install a garbage disposal?

While there are some general commonalities that are helpful to know, there are no specific set of installation instructions that work for every garbage disposal.

It is always recommended that you refer to and follow the owner’s manual that came with your disposal for precise installation instructions.

Garbage Disposal Installation
  • Replace:

    The installation process for replacing a garbage disposal is a somewhat complicated project for the average homeowner. If you’re relatively handy, you will likely have no trouble doing it on your own. However, if you are not confident in your plumbing skills, it would be best to hire somebody.

  • New Install:

    If you are adding a disposal as part of a kitchen remodel, the installation process is going to be significantly more difficult than a simple replacement. Still not impossible for your average DIY homeowner, but you’ll now have to consider the cost of wiring and other possible electrical needs. It may be wise to hire somebody.


Can I call someone to help with installation?

Absolutely! There are plenty of handyman, plumbers and other general contractors out there that will do this job. Just make sure you do your research and hire only a qualified, certified and licensed contractor. If you decide to go this route, make sure you read these tips from the FTC first.

Depending on the retailer that you bought your garbage disposal from, they may offer installation services. Likely, this will include an extra charge, but it’s well-worth the security of knowing that your unit is installed correctly, by a professional.


Are disposals loud?

Yes… and no. This is hard question to answer, really.

The overall decibel level will vary from model to model. Because it’s a motorized appliance, all garbage disposals will create some level of noise during operation. Much of the noise is due to the vibration created while the disposer is being used.

If noise is something you are concerned about, then you should look at buying a garbage disposal that has built-in insulation and anti-vibration features. Some manufacturers will also list the decibel level within the specs of each model.


Why is my garbage disposal humming / buzzing?

A common problem that homeowners may experience, this humming sound occurs when the disposal is clogged or jammed by an object inside. The unit is still receiving power when you try to operate it, but unfortunately, it is unable to grind food because it is jammed.

You do NOT need to call a plumber for this. It is a relatively easy fix that should only take a few minutes.

How to Unclog:

Find the owner’s manual for your disposal. Look for instructions on how to troubleshoot this humming problem. If you can’t find the owner’s manual for specific instructions, then you should carefully try to unjam it.

You can try following these instructions:

  • Unplug disposal.
  • Get the allen wrench that came with the unit, or find one that will work.
  • Crawl under your sink and look for a small hole that fits your allen wrench. It will be hexagon-shaped.
  • Insert allen wrench and turn. This should unjam the unit.
  • Plug in and turn it on.

Note: These are general instructions to unclog your garbage disposal. It is strongly recommended that you follow the instructions that the manufacturer provides for that specific model.


Where is the reset button on my disposal?

The reset button on your disposal is located at the bottom exterior of the unit. It is likely red, but this could vary. Please refer to the owner’s manual to understand how to properly use the reset button on your specific disposal.


Can I use a disposal if I have a septic system?

You can, but it’s not recommended. When you have a septic system, disposing of food waste down the drain is a bad idea for the following reasons:

  • You may disturb the balance of bacteria within the tank.
  • You fill up the tank quicker, thus have to pump it more frequently.
  • You may inadvertently cause problems with the tank, which may lead to costly repairs.

Who do I call to repair a disposal?

A plumber will be your best bet for repairing a garbage disposal.

However, depending on what the problem is, you may be able to repair it yourself. Before you call and hire someone, try to troubleshoot the problems and determine if you can fix it on your own.

For example, a clogged disposal is an easy fix for homeowners to do on their own. But, if the disposal is leaking, then you should turn off the water and call a a plumber.


Where can I buy a garbage disposal?

You can buy a garbage disposal from a wide variety of retailers, including both online or inside a store.

Before buy the first disposal you find at Home Depot or Lowes, we would recommend browsing your options online and narrowing down which model would be best for your home. You don’t have to buy online, but you’ll at least have comfort in knowing that you made an educated buying decision.


Water Quality

How to Test the Quality of Your Drinking Water

The majority of homeowners in the United States get their drinking water from public water treatment facilities, and we tend to accept without question that the water that flows from our taps is clean and safe to drink.

But is it?

Americans use thousands of different chemicals every day. Unbeknownst to us, many of these substances ends up in our lakes, rivers and aquifers. These may include pesticides, pharmaceuticals, solvents, weed killers, cleaning agents, you name it — all of these contaminants eventually finds its way into our water supply.

How Does Our Water Become Contaminated?

The contaminants that degrade the water quality come from a number of sources. Some of it gets there from people dumping it down their toilets, while other chemicals show up thanks to runoff from farms or mining, leaching from landfills, or improper storage and disposal at manufacturing plants. In addition to the chemicals, many of our waterways are filled with harmful bacteria, such as E. coli.

Some of these contaminants get removed during sewage treatment procedures, but others find their way into the waterways around our homes. It’s up to our water treatment facilities to properly process the water, removing all toxins to make it safe for us to drink before piping it to our homes.

Water Contamination

Is Your Drinking Water Safe?

The Environmental Protection Agency regulates a number of harmful substances, such as uranium, lead, and arsenic. For each of these, the EPA sets a Maximum Contaminant Level indicating at what concentration these chemicals and minerals can exist in our drinking water before it is considered unsafe to drink.

Each summer, the EPA issues a report for most municipal water systems in the country. These Consumer Confidence Reports (CCR) can be searched on the EPA’s website.

In the CCR, at minimum you can expect to find the following information:

  • The source of your drinking water.
  • A discussion of the general risks of contamination.
  • A list of regulated contaminants and their levels in the water at the time of testing.
  • Possible health risks from these contaminants found in excess of EPA standards.
  • What your local water treatment facility is doing to correct any problems.

The Downside of the EPA’s Annual Water Quality Report

While these reports are a great resource that provide a high-level overview of what’s in the pipes in your home, they cannot reliably provide a complete picture of your water quality.

EPA Water

For the reports, water is tested only once or twice a year and contaminant levels are averaged out across 12 months. Contamination can occur outside of testing periods, or there can be occasional spikes in certain contaminants that exceed EPA regulations, and these issues may not be captured in the report. Furthermore, it’s possible for your water to become contaminated after it leaves the treatment facility.

Contaminants Not Measured by the EPA

As another point of concern, just a few of the chemicals that can be found in our drinking water are measured or regulated by the EPA. Independent water testing laboratories confirm a wide variety of contaminants that may be found in our water supplies. In water samples taken from across the country, these labs have discovered measurable quantities of contaminants as varied as antidepressant medications, artificial hormones and gasoline additives.

The EPA doesn’t regulate most of these chemicals in our drinking water. Although most will only occur in trace amounts, there’s no way to know what the chemical cocktail might be doing to our health. Most of these unmeasured contaminants have no taste or color and pass through our water and into our bodies undetected. While many of these substances may be harmless in and of themselves, there are few studies to suggest what these different chemicals might do in combination with others.


When Should You Get Your Water Tested?

The EPA recommends you test your water annually to get a sense for what you may be drinking and if there are changes over time. In addition to yearly water tests, some of the things that should prompt you to test your tap water immediately include:

Water Quality Testing
  • Recurring stomach or digestive issues: This may be a sign of bacterial contamination.
  • Cloudy, frothy, discolored or smelly water: This can be caused by a number of contaminants.
  • Living in an older home: Aging plumbing may leach copper and lead into the drinking water.
  • Red or rust-colored stains on your sink or clothing: This is a sign that your water has high levels of iron or other minerals.
  • Nearby coal, gas or agricultural activities, especially fracking: These industrial areas may lead to pesticides, herbicides or solvents leaching into your water.
  • Living close to landfills, gas stations, industrial plants, dry cleaners: Many substances can leach into the ground and, possibly, contaminate local water supplies.

For a more comprehensive list, the EPA offers this handy chart (PDF) that can help you determine when you might want to test your water, with symptoms that can occur with certain contaminants.


How to Find Out What’s in Your Water

If you’re experiencing any signs that indicate something could be in your water, or if you want to test your water for your own peace of mind, you have a few options to choose from. The cost and accuracy will vary, so it’s important to do some research on your options prior to investing.

Sending Samples to a Testing Lab

There are many professional water testing labs that can provide extensive testing on water samples you provide. They send you a kit and instructions on how to collect water samples, and then you send the samples to the lab for evaluation.

How to Test Water Quality

Generally you can choose which kinds of tests these labs will perform, from testing for common contaminants to specialized tests for radon, uranium or other substances depending on your location and personal concerns.

These labs provide tests for tap water from both water from city treatment plants and well water, so they’re a good option for the majority of homeowners. The least expensive tests run about $50 and the most extensive ones can cost over $400, so it’s a good idea to know what you’re looking for before purchasing a test kit.

Is a DIY Water Testing Kit Worth the Cost?

Those costs may seem exorbitant, and you do have other options. There are inexpensive home testing kits you can purchase from home improvement stores and online merchants. These kits purport to test for bacteria, lead, pesticides, chlorine, nitrates and nitrites, and can also tell you the hardness and pH of your water.

These kits may seem like a great way to check your water quality and identify potential problems, but they cannot test for all contaminants, including fluoride and glyphosate. They are also far less reliable than laboratory tests, so the results should be taken with a grain of salt.

Do These Types of Kits Even Work?

Good Housekeeping performed a review of different do-it-yourself home water testing kits. Their results showed that most of the common tests inaccurately measured levels of certain contaminants, while entirely missing others. Even worse, many of these tests have given false positives that may cause you to take expensive preventative action when no such need exists.

So, what should you do?

If you’re just curious about your water but have no serious concerns, trying out a DIY kit may be a good place to start. However, if you have any concerns about your water quality, or you have anyone with health issues, small children, or elderly family members, you should probably consider a professional testing lab.

Just be careful: There are some labs out there that offer “free” water testing, but those usually are fronts for companies that want to try to sell you expensive filtration solutions you don’t need. You can find some of these “free” options available near many Home Depot locations.

If you have evidence of contaminants in your water, you can report it to the EPA’s Safe Drinking Water Hotline, 1-800-426-4791.


How Can You Remove Contaminants?

For some contaminants, it’s easy to remove them with a filter that attaches directly to your faucet or by using a water pitcher filter.

These filters are inexpensive and easy to maintain, using activated charcoal as their primary filtration medium. They are perfect for removing chlorine (commonly added to disinfect municipal water). Depending on the manufacturer and freshness of the filter, they can also remove trace amounts of minerals such as zinc, lead, copper, and asbestos, as well as some bacteria or other biological contaminants.

Removing Lead from Drinking Water

Because of the significant health problems associated with consuming any levels of lead, if you’re concerned about the lead content in your water, be sure to do your homework. Most pitchers and faucet filters are not certified to remove lead from drinking water.

Reverse Osmosis System

Furthermore, a number of other contaminants cannot be removed with inexpensive filtration solutions. For safe removal of lead, pesticides, glyphosate, fluoride, and many other contaminants, a reverse osmosis filter might be the best solution. For many homeowners, the best choice will be a reverse osmosis filtration system that is installed directly under the kitchen sink, but you can also install a “whole-house” unit that works for the water in the entire home.

What is Reverse Osmosis?

Reverse osmosis is the process many bottlers use to produce ‘purified’ water, and this type of filtration will remove the majority of contaminants from your water. The downsides of these units include a high initial setup cost and a higher consumption of water as part of the filtration, which will increase utility bills.

Hopefully now that you’re armed with all of this information about water quality and filtration, you will be able to make an informed decision about when and why to get your water tested, as well as have some solutions if you find out you do have unwanted substances in your drinking water.

Egg Shells

Why You Should Never Put Eggshells Down Your Garbage Disposal

For many homeowners, the garbage disposal in the sink is an afterthought. It’s where the food waste goes because you don’t want it to stink up your trash can.

This is understandable. Nobody wants the unpleasant aroma of trash lingering in their home. But, many homeowners don’t realize that some foods should never be put into a garbage disposal.

Today, we’d like to highlight one food item in particular: eggshells.

For many families, eggs are a staple in the home. Consumed daily and prepared in countless ways. But, while you’re busy thinking about cooking your eggs, the shells are likely something you don’t put much thought into. Most homeowners simply toss them in the trash or the sink, while keeping the focus on not burning the eggs (again).

Below, we discuss some of the most common questions about eggshells, why you shouldn’t put them in your garbage disposal, and what you should do with them instead.

Can You Put Eggshells in the Garbage Disposal?

No. This is not a wise idea.

When they are ground up, eggshells can quickly turn into tiny particles that, in turn, may lead to a clog in your garbage disposal, or even in your pipes.

To help you visualize what could potentially happen, pretend for a moment that ground-up eggshells are like sand. Tiny particles that may flow with water, but may also clump together and create a blockage. When confined in small spaces, such as the inside of a pipe, it is more likely that the eggshell-sand will clump together.


Do Eggshells Sharpen Garbage Disposal Blades?

This is unlikely. In fact, a garbage disposal doesn’t use “blades” to break down your food.

But, it is also worth noting that you will likely get different answers depending on who you ask. The general consensus is that eggshells will not sharpen any of the components inside the unit. In fact, these may actually cause more problems than you set out to resolve.

Try Using Ice

If you’re looking to sharpen the “blades” — they’re actually grinders — inside your disposal, you should try using ice. Any size or shape will work, as long as the ice is frozen solid. Avoid the softer flake or nugget ice, as those won’t pose a significant challenge to the unit.

The upside to using ice, is that nothing will be left behind that may cause issues or clog your disposal. Unlike eggshells or citrus peels, the melted ice water will simply go down the drain.


Is This the Same For All Disposals?

Probably not. The usage tips will likely vary for all brands, as well as all models manufactured by those brands. It would be wise to refer to the user manual for your model to get the precise answer.

However, despite what may be listed in the user manual or what type of waste your disposal is capable of handling, it is still wise to avoid putting eggshells down the unit.

Even with the best of the best garbage disposals, you will be unable to eliminate the potential problems that finely-ground eggshells may create inside your pipes. Over time, they may build-up and create a clog. This can lead to some very costly repairs.


What Can You Do With Eggshells?

While your average person may consider to them to be waste, eggshells have many uses. The below suggestions are simple and easy for every homeowner.

  • Dry, Grind & Add to Soil — You can use egg shells in your yard or garden to help replenish nutrients in the soil. For maximum effectiveness, it is recommended that you grind your shells as fine as possible, and then sprinkle it around your yard or garden.
  • Compost — Similar to tossing them in your yard, you can also add egg shells to your compost bin. This will expedite the decomposition process, giving the compost a boost of calcium. For gardeners, this is an easy way to avoid your pepper important nutrient.
  • Use For Seedlings — Instead of buying a seed-starter pot, you can use old egg shells to start seedlings. This is not only an easy way to get kids involved with gardening, but the shell also acts as a natural source of food for your plants as it decomposes. More on that below.

What Are Egg Shells Made Of?

When broken down and analyzed, egg shells are comprised almost entirely of calcium carbonate.

With the same molecular formula as limestone, calcium carbonate is commonly used for calcium supplements, antacids and chalk.


Are Eggshells Good for Plants?

Yes, but not as a substitute for fertilizer or other liming material.

According to multiple studies, egg shells can be used to help supplement the soil with calcium. However, to have any meaningful effect, the shells need to be ground as fine as possible. Simply tossing the shells in your yard and crushing them with your hands or feet is not going to provide the soil with any sort of timely benefits. The decomposition process is incredibly slow.

With that said, there is no harm of adding large shells to your yard. While you may not replenish the soil as quickly as you hoped, there is no risk to your grass or plants.