Portable Air Conditioner

Can A Portable Air Conditioner Save Money On Energy Bills?

This is one of the most common questions that homeowners have when they are considering whether or not a portable air conditioner is the right fit for them. And, the answer is wholly determined by how you plan on using the air conditioner itself.

The Quick Answer

Yes. Portable air conditioners can save you money and lower your energy bills, but only if you are strategic in how use it.

The Long Answer

Okay, now that we got the cliff-notes answer out of way, let’s dive a little deeper into how you can use a portable air conditioning unit to save money on your monthly energy bills.

Energy Efficient Portable Air Conditioner

Are Portable AC’s Energy Efficient?

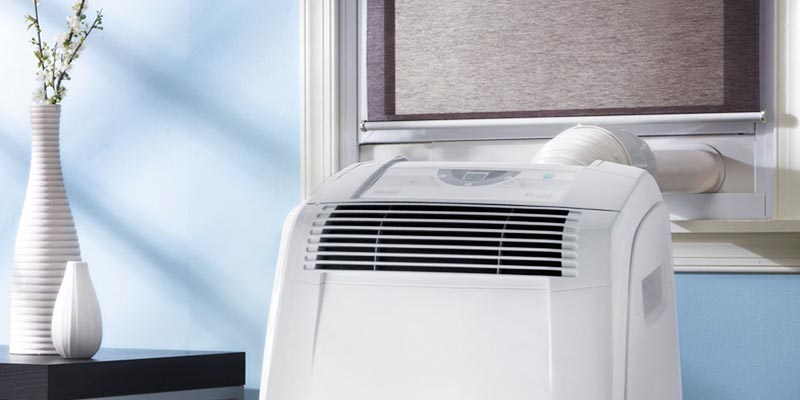
No, not really. Out of all the various types of air conditioners available to homeowners, portable AC units are generally one of the worst in regard to energy efficiency.

When you compare portable air conditioners to other types of room AC units, you’ll find that they score terribly in a side-to-side comparison. You’ll find that both window and ductless AC units all have higher CEER and EER ratings, making them the cheaper choice for daily operation.

The simple truth — Portable AC units will use more energy to hit your ideal cooling temperature.

But, that doesn’t mean that you can’t use this type of air conditioner to help you save money and lower your energy bills.

3 Cooling Strategies That Save Money

I know what you’re thinking. If a portable air conditioner is such an energy hog, then how will it save money?

There’s a couple of strategies that you can follow to help you save money, and use your portable AC to stay cool. But again, it all comes down to how you use it.

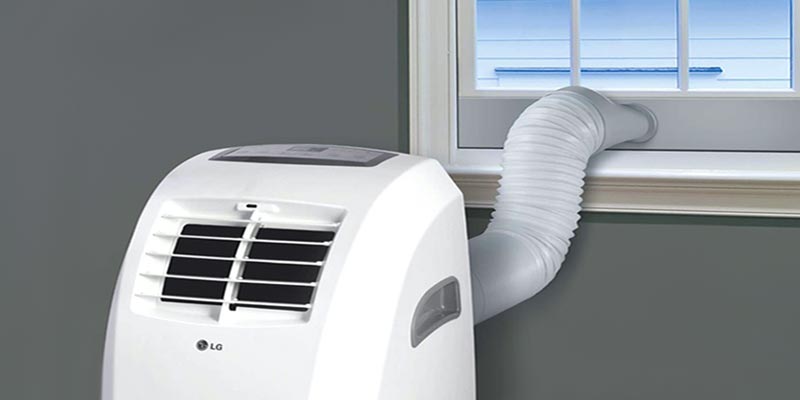
The “Portable” Cooling Strategy

Portable air conditioners still have one notable advantage, and it’s so obvious that it’s baked right into the name.

Portable Air Conditioner

This is the only type of room air conditioner that doesn’t require permanent installation. By taking advantage of a few extra accessories, you can easily move a portable AC from one room to another.

  • Rolling vs Carrying:

    The majority of manufacturers will include castors with the unit, but these can also be bought from any home improvement store. If you plan on moving a portable air conditioner from room to room, these are strongly recommended. They will make it easy to roll around, and you won’t have to worry about straining your back by picking it up.

  • The Venting Challenge:

    The only significant challenge is whether you need to install the window vent every time you want to move the AC unit. If so, this will become tiresome. Instead of bothering with this inconvenience, yu should consider buying an extra venting kit and installing it in the rooms you frequent the most.

Why This Saves Money

If you live in a small home or apartment, this is a great way to save some money. Instead of buying an air conditioner for each room, and dealing with the hassle of multiple installations, you can simply move a portable unit when you need.

The extra venting kits are just a simple click into place, and the castors allow you to roll it around your home with ease.

The only inconvenience is remember to actually move it when you need.

The Supplemental Cooling Strategy

This is where the real money saving opportunities come in to play, and is applicable for every homeowner, no matter how large or small your home may be. And it’s especially useful for anyone that is using a central air conditioner to cool their home.

Take a moment to consider how often all the rooms in your house are occupied at the same time. This is probably a rare occurrence, yet… every single day, you pay to keep those rooms cool.


Think about that.

How much money do you think you’ve lost, by cooling rooms that don’t really need to be cooled? Instead, try setting your thermostat at a reasonable, yet still relatively comfortable, temperature, and then use a portable air conditioner to quickly cool down the most important rooms.

This is called the supplemental cooling strategy. And it will save you lots of money, when used correctly.

Why This Saves Money

You no longer have to pay for your entire home to be cool, when only one or two rooms are being used.

As an example, think about your bedroom. You spend roughly 8-10 hours in that room every day. And a good night’s sleep is dependent on how comfortable you are. However, as you drift away into deep sleep, you’re continuously paying to keep the rest of your empty home at that same temperature. This happens every time your head hits the pillow. The energy cost adds up over time, and the amount of money that you’re wasting may just give you nightmares.

As an alternative, use a portable air conditioner to cool just your bedroom. And set your central air conditioner to a more energy efficient temperature. This gives you the flexibility to stay cool all night long, but save money by using less energy in total.

Note: When the cool nip of winter starts to hit, this same supplemental strategy can be applied when heating costs start to rise. Just swap out your AC unit for a heater, or plan ahead and buy a portable air conditioner that has heating functionality.

The “Don’t Piss Off Your HOA” Strategy

A quick glance at the reviews for popular window AC units, and it’s hard to miss the obligatory complaint about how somebody’s Homeowners Association made them take down their window unit.

Portable Air Conditioning Unit

This is actually a pretty common scenario.

While every neighborhood and HOA have their own set of rules, one of the most common restrictions found across them all is about window air conditioners. They’re an eyesore. They may not be safe. They are too loud. There’s a plenty of reasons they are restricted.

Unfortunately, most homeowners don’t even realize it, until it’s too late. It’s already installed in your window, and you’re living the comfy life as you open that HOA notice.

Why This Saves Money

Unlike the other cooling strategies above, this one will prevent you from wasting time and money with a window air conditioner that is only going to upset your HOA.

Nobody has time to deal with an overzealous HOA, and returning a large appliance is a hassle in itself.

If you’re one of the unfortunate homeowners that has already bought and installed a window air conditioner, then you may have already lost money. Hopefully, the manufacturer of the AC unit has an accommodating return policy and a low restocking fee.

Final Thoughts

Portable air conditioners get a bad rap. It’s true that they are not the most energy efficient air conditioner available, but if you are clever in how you use the device, there is no doubt that it can save you quite a bit of money and lower your energy bills.


Kale

How to Make Kale Chips (With Recipes & Flavoring Tips)

We hear about many food crazes and diets all the time. Let’s face it. Every time a new food is introduced to the world, restaurants, food critics, television chefs and celebrities go out of their way to talk about the food as they try to show us the infinite possibilities there are for turning an otherwise boring ingredient into something special.

That’s probably the case with kale.

A few years ago, no one ever talked about this green leafy vegetable. Now you see it everywhere. High-end restaurants are finding ways to elevate it from its former role as a garnish on food trays and salad bars. Grocery stores are selling packaged salads that use kale, bags of washed kale, and bunches of kale. It’s even on the shelves of Walmart Supercenters and other discount stores. It’s also become a critical addition to the growing movement that encourages embracing ingredients that go from the farm to your table.

According to a May 2014 news report from Bloomberg, between 2007 and 2012, the number of farms that grow kale in the United States has more than doubled.

How Did Kale Become So Popular?

It’s long been known that kale is healthy for you. But, the popularity of the cruciferous vegetable has skyrocketed in recent years. The story behind this rise is a curious tale.

Fresh Kale

As the story goes, in the year 2013, a New York PR agent and self-proclaimed “punk-at-heart,” Oberon Sinclair, concocted a scheme to get people to believe that the American Kale Association hired a publicist to help desperate farmers who were growing kale while spreading the word about this dark green cruciferous vegetable throughout New York City.

After all, when you want to turn something into a trend, you go to New York to announce it to the world, right?

It’s hard to know whether people believed this story because let’s face it, no self-respecting foodie would ever admit that they’d been conned into believing that the American Kale Association (AKA) launched a campaign to promote the wonders of kale. Especially considering that the American Kale Association did not exist when Sinclair launched her campaign.

Whether or not the American Kale Association actually existed at that particular time, has become somewhat of a moot point. It exists now, and has carried on with the original “kale-awareness” campaign.

However, it must be noted that prior to the curious PR campaign launched by Sinclair, there was another organization already on this precise mission. Founded one year before the curious PR campaign referenced above, the National Kale Day Organization was created with the same vision: To educate people about the nutritional value of kale and helping people learn about different ways to cook, use and eat it.

Cruciferous vegetables are healthy. They are full of vital nutrients. Variety is also good. So if you’re looking for a way to add variety to your diet, include more healthy leafy greens, and eat more vegetables, you might want to consider trying kale. Raw kale can be bitter. But there are other ways to use it. It’s a delicious addition to soup, and if you’re used to sauteing spinach, Swiss chard, mustard, turnip or collard greens, you can add kale to your gustatory library.


Bunch of Kale

How to Select the Best Kale

Before you start the process of making kale chips, you have to buy the vegetable itself. You have a few options to choose from.

Fresh & Raw

You can find fresh bunches of kale in the produce section, typically stocked alongside other cruciferous vegetables, such as spinach, broccoli, lettuce and cauliflower. The key is to get a bunch of kale where all the leaves are dark green and crisp looking.

Starting at the end of summer through winter, you’ll notice the selection and overall price of kale become more competitive, as they are in season.

Organic & Locally-Grown:

If possible, try to buy organic kale that is locally-grown. The Environmental Working Group includes kale on its list of produce items that contain pesticide residue.

Bagged Kale:

If you’re short on time, bagged kale is a good option. Already chopped and washed, the bagged option will save you time. However, this added convenience comes with its own set of pros and cons. Not only do the bags tend to be more expensive, you also sacrifice the ability to hand-pick the bunches you believe would be the best.


How to Prepare Your Kale

Now that you have the kale bought and ready to go, it’s time to prep.

Cleaning:

Before you start, it is strongly recommended that you thoroughly wash all of your produce before cooking with or consuming. This is especially true with kale, as the leaves are often covered with dirt and other loose materials.

Kale

Remove Stems:

Use a herb stripper (if you have one) to remove the stems. Don’t skip this step. Kale stems are tough, and they’ll take much longer to cook. You’ll risk burning your kale leaves if you don’t remove the thick stems.

Tear the Leaves:

Tear each leaf into pieces. The size of your pieces should be comparable to that of a potato chip or tortilla chip. Don’t go to a lot of trouble to make sure that each piece you tear is the same size. That’s not necessary.

Remove Excess Water:

Now that your kale leaves have been torn into smaller chip-size pieces, you’ll want to remove the excess water. A salad spinner is a fantastic tool to help you with this. If you don’t have a salad spinner, give each piece a little shake and the water will roll off.


How to Bake Kale in the Oven

You’ll want to lay your kale pieces in a single layer on a flat baking sheet. If you intend to add salt, spices or herbs for flavor, a small amount of oil will catch the seasoning. Fill a half a tablespoon with extra virgin olive oil. Spread it on the baking sheet and rub each torn piece of kale into the oil, making sure to massage the oil into both sides.

Some recipes recommend using coconut oil. For kale chips, since you’ll be baking them in an oven that’s moderately hot, you won’t have to worry about whether the oil is safe for high heat.

If you line your baking sheet with a piece of parchment, clean up will be easier. You also won’t have to worry about whether anything sticks to the pan.

You don’t have to use a dehydrator to make kale chips. The oven is a fantastic alternative because you can turn the baking sheet during the drying and baking process.


– Advertising –

Recipes recommend oven temperatures but expect to adjust the temperature because of variations in different oven brands and heating methods. Turn the baking sheet periodically during the cooking process to make sure that every piece of kale cooks evenly.

Supplies & Ingredients You’ll Need:

  • Parchment Paper
  • An oven thermometer
  • Baking Sheets
  • Herb stripper or sharp knife to remove tough stems
  • Colander and Salad Spinner
  • Large bowl
  • High quality unrefined and unprocessed oil
  • Sea salt

Tips to Baking Kale Chips:

  1. Be sure you get rid of all of the loose dirt on every kale leaf. Consider using a commercial vegetable cleaning spray to help you remove excess chemical residues and grime.
  2. When you tear up your kale leaves into chip size pieces, take time to tear each leaf so that you remove the woody stem that goes through the center of the leaves. Getting rid of every part of the hard stalks will ensure that every piece of kale gets thoroughly cooked.

Be sure you put your oven thermometer in the oven before turning it on to preheat it.

Don’t get discouraged if you don’t make a perfect batch of kale chips the first time. There are often huge variations in cooking times and temperatures depending on the type of oven you’re using, your location and other environmental circumstances. Consequently, you may need to make several batches of chips before you figure out what oven temperature and the length of time it takes to get your chips as crisp as you like them.

Another thing to consider is that you may want to bake your kale pieces at a lower temperature if you’re topping your chips with herbs, seasonings or other flavorings. A lower oven temperature will force you to keep the chips in the oven longer to get them to the desired crispiness. It may also be effective at infusing your chips with more of the flavor you’re adding to them, thereby allowing you to create an unusual, creative, and flavor-packed snack treat.


Kale Chips

A Starter Recipe for Kale Chips

As you’ll soon find out, there is no limit to the flavor combinations that you can come up with to make your own healthy and delicious kale chips. Regardless of the flavors you add, there are two essential ingredients you’ll need to use no matter what else you decide to add.

You’ll need to add some salt to the kale because the salt is critical to drawing excess water out of the kale leaves. You’ll also need to use some type of high-quality extra virgin, first cold-pressed oil. Since you aren’t going to be baking the chips in a hot oven, you can use any kind of oil that tolerates low-to-medium heat. The first cold-pressed Extra Virgin Olive Oil is probably the most common type of oil used for making homemade vegetable chips. Grapeseed, unrefined sesame or coconut oils are also options.

How to Make Flavored Kale Chips

There are all sorts of flavors and flavor combinations you can use to create different variations on the traditional kale chip.

How to Make Kale Chips

Regardless of the ingredients with which you intend to flavor your chips, don’t forget that you’ll need to use a small amount of oil as a way of ensuring that each piece of kale gets evenly coated with the herb, spice, condiment or flavor.

Unless you want your kale chips to absorb the flavor of the oil you’re using, you will want to use the purest, mildest, and least flavorful oil you can. Also, remember that temperature isn’t a concern since you’ll be cooking your flavored chips at a lower temperature than you use for the plain chips.

Flavor Combinations to Spice Up Your Kale

If you’re used to snacking on corn or potato chips and have a favorite variety, there’s no reason you can’t try to replicate the taste of that chip on kale. The result will be a healthier version of a snack treat you already like.

1. Salt and Vinegar

This may be a tricky taste combination to try to use with kale. Oil is necessary to get the salt to stick to the kale pieces. If you try to use oil and vinegar, you may wind up with something that tastes more like a wilted salad that’s dressed with oil and vinegar dressing.


– Advertising –
How to Add Flavor:

To make this flavor combination work, try soaking your kale leaves in the vinegar for a few minutes. That short “soak” will give your kale the necessary infusion of vinegar for the taste combination that’s so popular with potato chips. You’ll still need to coat each piece of kale with the salt and oil mixture.

Baking Instructions:
  1. Lay the coated pieces of kale on a parchment paper-lined baking sheet. Don’t let any of the pieces touch or overlap.
  2. Cook the chips at a low temperature of around 250-275 degrees.
  3. Bake the chips for 25 minutes and check them to see if they are drying out and getting crisp.
  4. You may need to rotate your baking sheets every 25 minutes or so to make sure that every chip cooks evenly.

Keep checking on the baking sheets to make sure that nothing is burning. Once you’re sure that the chips are fully cooked, remove them from the oven. You can leave them on the baking sheet to cool. As they cool, you’ll see that they become even crispier.

Dehydrated Onion Flakes:

Dehydrated onion flakes are easy to find in the spice section of your favorite grocery store. If you love the taste of onion, and would like to add that flavor to your kale chips, dehydrated onion flakes are going to be a great option for you. Plus, give your kale chips an extra crunch.

Follow the instructions listed above for removing the thick stems on each leaf. Then tear all of the leaves into chip-size pieces.

How to Add Flavor:

Add a couple of tablespoons of high-quality extra-virgin “First Cold” pressed olive oil to a large bowl. Add enough onion flakes to cover all of the kale pieces evenly. Use your hands to massage the oil and onion flake mixture into the bowl full of torn kale leaves.

Baking Instructions:
  1. Line your baking sheets with pieces of parchment paper.
  2. Preheat your oven to 250 degrees.
  3. Carefully lay all of the kale pieces out on the baking sheets, making sure that there is space between each piece.
Plate of Kale

Because you’re baking your kale chips at a lower oven temperature to allow the oil and onion flake flavors penetrate each of the kale pieces, you will need to cook your chips for twice as long as it takes to make kale chips with no added flavoring.

Garlic or Onion-Powder:

If you ever make popcorn at home, you may have learned about the delicious taste of garlic and onion-flavored popcorn. Garlic and onion powder are also excellent flavor enhancers to add to kale chips. This is especially true for anyone looking to introduce finicky family members to a healthier alternative to calorie and salt-laden junk food.

Adding Flavor & Baking Instructions:
  1. Add a couple of tablespoons of olive oil to a large bowl.
  2. Add your kale pieces and use your hands to make sure that every kale piece is evenly coated with the olive oil.
  3. Arrange the kale pieces so that every piece lays flat on the parchment-lined baking sheet.
  4. Sprinkle your garlic or onion powder, or a little of each over the entire baking sheet, making sure that an even coat of powder covers every piece of kale.
  5. Place your baking sheets into a preheated 250-degree oven.
  6. Set an oven timer for 25 minutes.
  7. Rotate the baking sheets to ensure that all of your chips get as crisp as you like them.

Other Spices, Additives & Flavor-Enhancers

Here are a few more options for adding flavor and spices to your homemade kale chips.

  • Sriracha — If you like to add heat to your food, you might want to brush your kale chips with Sriracha sauce before you bake them.
  • Red Pepper Flakes — These add zesty heat and will stick to kale leaves that are coated with oil.
  • Chili & Taco Seasoning — This will give your kale chips a bit of spicy Mexican flavor.
  • Smokey — For an added smokey taste, consider sprinkling ground chipotle peppers or smoked paprika over your oil-coated kale pieces.
  • BBQ — If you like the taste of barbecue-flavored chips, sprinkle your oil-rubbed kale pieces with a barbecue spice mixture or dry rub.
  • Parmesan Cheese — For a cheesy taste, sprinkle grated Parmesan cheese over oil-covered kale pieces.
  • Brewer’s Yeast — This tastes great on popcorn. Capture that distinctive taste by sprinkling an even coating of brewer’s yeast over oil-saturated kale leaves.
  • Chocolate — If you’re the total chocoholic and go to every extreme to get your chocolate fix, consider sprinkling grated chocolate on oil-covered kale leaves. Use a mild or flavorless oil like coconut oil, so the oil doesn’t overpower the additive. You can use bittersweet chocolate to give your kale chips a savory chocolatey taste.

Final Thoughts To Keep In Mind

Here’s a few parting thoughts to keep in mind as you try your hand at homemade kale chips.

  • Be sure you have fresh, crisp kale leaves. If you’re buying kale by the bunch, be certain you remove the thick, hard stems and massage all of the leaves as you wash them. Use your hands to remove embedded sand, dirt and debris. This may seem like a time-consuming process, but your kale chips will be inedible unless you remove all of the ground in dirt.
  • Use a cooking timer to remind you to check on the progress of your chips. An oven thermometer allows you to monitor your oven temperature to ensure that it is consistent. Some electric ovens have less than consistent thermostats.
  • Don’t try to bake all of your chips at once. Use one oven rack. If your rack only holds one or two baking sheets at once, plan to cook your chips in batches.
  • Don’t prepare your kale leaves until you’re going to cook them. Kale is full of water, and it wilts and gets soggy very quickly.

Kale is a fantastically healthy and inexpensive fall and winter vegetable. It’s also fun to create new chip recipes by adding herbs, seasonings, and other flavor enhancers so you can enjoy different versions of your newfound healthy snack treat. Pack a bag full of kale chips to take to work or to add to your children’s school lunches.

Portable Ice Maker

Portable Ice Maker FAQs

What is a Portable Ice Maker?

A portable ice maker is a small appliance that is designed to make ice, but doesn’t require permanent installation or a dedicated water line. You can plug it in and make ice at your convenience, or store it out of the way when you don’t need it.

How does a portable ice machine work?

Portable ice makers operate by quickly making small batches of ice from water that you pour into the unit. Once a batch is ready to serve, the machine will drop the ice down onto the tray for you to scoop out when needed. Simply plug it in, pour in some water and you’ll have ice within a few minutes.

However, unlike other types of ice makers, portable units don’t have a drain, so as the ice begins to melt, the water simply drips back down into the basin whereupon it is turned back into ice.

The cycle repeats until there is no more water in the ice maker.


How do you clean a portable ice maker?

Cleaning your portable ice maker is a simple task, and just about the only maintenance needed to keep it operating in an efficient manner.

Portable Ice Maker

Every ice maker will have their own specific cleaning instructions in the manual that came with the device. You may also be able to download them from the manufacturer’s website.

If you don’t have access to the cleaning instructions for your specific model, you can follow these steps:

  1. Unplug the ice machine.
  2. Empty all water or ice.
  3. Disassemble interior pieces and wash separately.
  4. Clean the interior with a towel.
  5. Pour a generous amount of vinegar into the unit with some water.
  6. Allow device to run a few cycles and discard all ice with vinegar.
  7. Allow machine to dry before using.
  8. Add fresh water and enjoy.

Note: You can substitute vinegar with a cleanser made for ice machines.


How long does it take to make ice?

This will vary between different models, but generally, a portable ice maker will produce ice within 7-15 minutes after you add water.

It’s important to note that there are a few other variables that can play a role in slowing down production of an ice maker.

  • The type of water you use.
  • How often you clean the ice maker.
  • The age of the ice machine.
  • Frequency of use.

If you use hard water and don’t clean your ice maker on a frequent basis, then it is likely that mineral build-up will start to happen inside the device. This will slow down production time and quality.


Do portable ice makers need a dedicated water line?

No. A portable ice maker does not need or even require a dedicated water line to work. As the name suggests, this appliance is designed to be portable, allowing you to plug it in when and wherever you need it.

When you want it to produce ice, you simply plug it into an outlet and fill the reservoir with water. The unit will start producing ice relatively quickly.

This lack of a water line is one of the main differences that sets a portable ice maker apart from other types of ice machines. This may be considered both an advantage and disadvantage, depending on how you plan on using it.


Do portable ice makers need a dedicated drain line?

No. A portable ice maker does not need or require a dedicated drain line to operate. Much like a dedicated water line, a built-in drain line would make it less portable.

Due to how this type of ice machine works, it has no need for a drain line. As the ice melts, the water goes back down into the basin where the machine turns it back into ice. This process repeats until you have consumed all the ice, or add more water.

Note: To ensure that your ice is fresh and tasty, it would be wise to drain any water that has been sitting in the unit for more than a day.


Does it matter what type of water I use?

Yes, to some extent. The overall quality of the ice produced by the machine is largely determined by the quality of the water you pour into it. But, the type of water you add to the unit can also play a role in its ability to produce ice, how often you have to clean the unit, and its overall lifespan.

Obviously, the water should be potable. If it’s not safe to drink, then there’s no reason it should be inside an ice machine. But outside of whether it’s safe to consume, determining the “best” type of water is going to be subjective.

  • Hard Water — Generally, it would be wise to avoid “hard water,” as it will eventually lead to mineral build-up inside your ice machine and diminish the quality of ice that is produced. This applies to all appliances.
  • Distilled Water — While this type of water has less minerals, it may also cause performance issues with some ice makers. This is due to the usage of sensors inside most portable ice machines that rely on mineral content to determine whether more ice needs to be made.
  • Filtered & Purified Water — These fall somewhere in the middle. The mineral content will be lower than hard water, but not low enough that the sensors inside are unable to perform their duty. The water quality is usually better, which means you should get ice that smells and tastes fresh.

With all of that said, the best type of water should always come down to the experience you get from the ice.


How does ice production differ from ice storage?

Often overlooked, the product/storage capacity are two considerations that one must take into account before buying any type of ice maker. All manufacturers will have these listed somewhere in their spec sheet.

  • Storage — This defines the maximum amount of ice the unit can have ready to serve.
  • Production — This defines the maximum amount of ice the unit can produce in a day.

This is also another major difference between portable ice makers and other types available. Because they are designed to take with you on-the-go, portable units will be significantly lower in both capacities.


Is a portable ice maker a freezer?

No. This type of ice machine is not a freezer, nor is it a suitable alternative to a freezer.

While the design will vary from model to model, all portable ice makers have an insulated exterior to help keep the ice frozen and ready to consume. However, there are no portable machines that double as a freezer. This means that the ice will slowly start to melt the moment it hits the tray.

Once it melts, the water goes back down into the basin where it is used to make another batch of ice.


How much electricity does a portable ice maker use?

Like all appliances, the amount of electricity will differ between brands and models, as well as how you are using the device and the frequency you clean it.

Countertop Ice Maker

For the most part, portable ice makers are not known to be very energy efficient. We are unable to find any portable ice makers that are EnergyStar certified.

However, that doesn’t mean that they are going to cost a lot to run. In fact, they use far less electricity than undercounter ice machines or refrigerators with an ice maker built-in. And if you only plug it in when you need ice, then it is very unlikely that you’ll notice any increase in your utility bills.

For more insight, we would encourage you to read this article from Wired Mag where they analyze, calculate and estimate precisely how much it would cost to use an ice machine.


Do these work with standard 120v wall outlets?

Yes. All portable ice machines will work with a typical 120v wall outlet commonly found in homes and offices. You should not need any other equipment to make ice.


What do I need to do before using the ice maker?

Once you unbox your portable ice maker, it is recommended that you make a few batches of ice and discard it. This will remove any possible dust or debris that may have gather inside the unit during packaging or shipping.


Who makes the best countertop ice maker?

We try to stay impartial when it comes to brands. Certainly, some brands are going to be more reputable than others, just based on how long they’ve been manufacturing this type of product. Of course, this is not an indication of a “better” brand, but does offer a glimpse at how reputable a company is.

To help you determine which brand is best for you, make sure you look over the warranty that comes with the product, as well as the return policy from where you purchased it. Also, take some time to read over some reviews that customers have left. While the reviews are never going to be an accurate assessment of the brand, you may gain more perspective of what to expect from that brands’ customer service.


What is the best portable ice maker?

There is no correct answer to this question. The best portable ice maker is going to depend on your needs. And for many homeowners, a portable ice maker may not even be the best fit for them.

To find the best portable ice maker, you should do careful research on the brands and models available within your budget, and then compare their features to narrow down the one you deem to be the best unit for you.


Where can you buy a portable ice maker?

You can buy portable ice maker from a wide variety of retailers, both online or in stores. You’ll find that you have a better selection online.

Before you buy a portable ice machine at Walmart or Home Depot, we would recommend browsing your options online and narrowing down which model would be best for your home. You don’t have to buy online, but you’ll at least have comfort in knowing that you made an educated buying decision.


Have a question that you didn’t see listed here? If so, please add it don in the comments below.
Beaucarnea recurvata

How to Grow a Ponytail Palm

As one of the most popular houseplants found in homes all around the world, the Ponytail Palm (Beaucarnea recurvata) is one of the easiest to grow and require very little maintenance by their owners. If you’re looking to add a splash of charm into your home, but don’t want to put much time or thought into it, then this tropical houseplant may just be the perfect choice for you.

Originating from the arid landscapes of Mexico, the name Ponytail “palm” is a bit of a misnomer. While the bulbous trunk indeed had some similarities to the trunks of other palm trees, the Beaucarnea recurvata is actually a drought-resistant succulent. And that bulbous trunk is where the plant stores its water.

Ponytail Palm

How to Care for Ponytail Palm

Ponytail palms are one of the easiest houseplants to care for.

They require little water, love lots of light, you don’t have to fertilize often, and they have the ability to adapt to the comfortable temperatures often found in homes. The downside of growing a ponytail palm inside your home is the incredible slow pace in which they grow.

As long as you don’t over-water it, you probably won’t kill it. It’s pretty much that simple.

However, if you want your plant to grow tall, thrive and be healthy, there are some easy guidelines you can follow to help you provide the best care for your ponytail palm.

Botanical Info

Latin Name Beaucarnea recurvata
Plant Family Asparagaceae
Genus Beaucarnea
Common Names Ponytail Palm, Elephant Foot Palm, Bottle Palm, Nolina Palm
Origin Mexico, South America
USDA Zone 10 – 11

Growing Conditions

Water Once every ~10 days.
Light Bright & full exposure to sun.
Soil Cactus potting soil.
Fertilize Once a month. Diluted liquid fertilizer.
Temperature Warm. Keep above 55°F.  
Humidity Adaptable. Not too low.  
Maintenance Easy to care for.  
Grow Inside? Yes
Grow Outside? Yes. Best in USDA Zone 10 – 11
Safe for Pets? Yes. But, care should be taken.
Container Size Depends on how large you want it to grow.  

7 Common Questions About Ponytail Palms

To help ensure that you’re providing to proper care for your ponytail palm, we have listed out the most frequently asked questions down below. If you have a question that you don’t see listed or would like to add additional feedback for others to learn from, please leave it down in the comment section below.

1. How often do you water a ponytail palm?

Not often, but the frequency depends largely on the environment you’re growing it in. Below, we have some general guidelines to watering a ponytail palm, but the best advice is to give it a drink of water when you see the soil start to dry.

  • During Hotter Months — You’ll want to water your ponytail palm plant once every 7-10 days.
  • During Cooler Months — You’ll want to slow down the watering schedule to once every 20-30 days.

If you don’t abide to that precise schedule, don’t fret. This plant is great at surviving long periods without water. But, if you want a healthy plant that grows to its fullest, you should try to follow the watering guidelines listed above.

Remember: The easiest way to kill a ponytail palm is by over-watering. Less is more.


2. How much light does it need?

Ponytail palms love lots of light. Remember, this plant is native to arid deserts, so full exposure to the sun will be appreciated by this plant. However, while full exposure is recommended, ponytail palms are adaptable to little or moderate amounts of light.

The downside of less light exposure is that you’ll see a noticeable slow down in its growth. And for an already slow-growing houseplant, this may just completely stunt it.

So, if you want your ponytail palm to grow tall, give it lots of light.

3. How often should I fertilize a ponytail palm?

Depends on the season and environment you’re growing your ponytail plant in. A general guideline is to fertilize your plant once every 3 or 4 weeks. If you see the tips of the leaves start to turn brown, then you’re using too much fertilizer.

  • Spring & Summer — Add fertilizer once every 2 or 3 weeks.
  • Fall & Winter — Add fertilizer once every 4 to 6 weeks.

Adding fertilizer is essential to the overall health of houseplants, and Beaucarnea recurvata is no different. Liquid fertilizers are recommended for ponytail palms, but granular fertilizers will also suffice. An all-purpose fertilizer will work fine here, but you can also consider using one formulated for cactus and other succulents.

4. What kind of soil should I use?

The best type of soil for this plant is one that drains quickly. Unlike many popular tropical houseplants, the last thing the ponytail palm wants is to sit around in moist soil for an extended period of time.

When you repot or transplant, it is recommended that you use a soil designed for cactus or succulents. If you want to make your own soil mixture, keep it light on the amount of peat you use within.

Remember: Keep the soil dry, and water sparingly.

5. Is repotting possible with a ponytail palm?

Yes, repotting a ponytail palm is possible and easy to do, but precautions should be made before you undertake this effort.

  • Size Matters — First, consider how large the tree is, and where you’re going to be moving it to. Larger plants will likely require more help from others, as well as a few other tools or equipment to assist in the transplant. On the flip side, if you’re repotting a small bonsai ponytail palm, then you likely won’t need any help or special tools.
  • Do In Spring — It is recommended that repot your ponytail palm early in the growing season, as this gives it plenty of time to adjust to the larger pot and form strong roots.
  • Examine the Roots — Once you have it out of the original container, take a close look at the roots of your plant. Look for any signs of bugs, rotted areas, or anything that looks injured or contaminated. Cut these off before you repot in new container.

Keep in mind: Transplanting it to a larger pot will encourage the plant to grow larger. This may be a deal-breaker for anyone growing a bonsai palm.

6. Is this plant safe for pets?

According to the ASPCA, the ponytail palm does not pose any toxicity threats to dogs or cats.

However, every homeowner with pets should know, and possibly take precautions if deemed necessary, that the leaves of the Beaucarnea recurvata contain saponin which may cause discomfort in some animals if ingested. So, while it’s unlikely that any harm will come to your dog or cat, it may be wise to keep an eye on them and ensure that they are not eating or chewing on the leaves.

It’s also worth noting that saponins are found in many popular houseplants, not just the ponytail palm. They also pose no danger to humans. In fact, saponin is found in many dietary supplements and are suggested to have some nutritional benefits.

7. Can you grow a ponytail palm outside?

Yes, but it’s recommended that you live in USDA Plant Hardiness Zone 10 or 11 if you want your plant to thrive. The sandy soil and hotter temperatures create an ideal environment for growing the ponytail palm outside.


Portable AC Unit

Portable Air Conditioner FAQs

What is a Portable Air Conditioner?

Designed to be moved from room to room with ease, a portable air conditioning unit is a smaller cooling appliance that vents directly out of your window, but doesn’t require permanent installation.

Generally, this type of air conditioner is engineered to cool individual rooms, not your entire home. To make it easier to move around, portable units often have wheels on the bottom and built-in handles on the side.


Portable Air Conditioner

Do portable room air conditioners work?

Yes, of course. They are a popular alternative to central air conditioners, and one of the better choices for cooling rooms in your home.

Of course, the amount of benefits you receive from a portable air conditioner is entirely dependent on how you use, how well you maintain it, the environment you are using it in, and a whole host of other factors. But, yes, portable air conditioners do work when used correctly.


Are these air conditioners energy efficient?

It depends on how you use it. When compared to other types of air conditioners, portable units are going to be one of the worst for energy efficiency.

Across the board, portable units tend to have a lower Energy Efficiency Rating (EER) than other air conditioners. The overall efficiency will vary per each model or brand, and you certainly will find some units that have a higher EER than others, but for the most part, this appliance is not considered as one that is energy efficient.

However, they do have the advantage of allowing you to cool only one room at a time. This cooling strategy will help you save money and cut your overall energy usage, as you’re not having to pay to cool your entire home. From this perspective, one could absolutely make the case that it is energy efficient.


Do all portable air conditioners need to be vented?

Yes. You will need to vent your air conditioner. This is typically done through a window, but you can also buy a vent kit that works with sliding glass doors, casement/crank windows or through a dropped ceiling.

Most portable air conditioners will come with everything you need to properly vent the device, including an exhaust hose and an adapter that sits in your window sill. Just remember to follow the instructions for the model.


What is a window vent kit?

The window vent kit will come with your portable air conditioner. Typically made from plastic, this is the piece of equipment that sits in your window sill and connects to your exhaust hose(s) of the AC unit.

The window venting kit will typically fit most standard-sized windows and sliding glass doors. However, before you buy a portable air conditioner it would be wise to measure the window and ensure the venting kit that comes with the AC unit will fit in your home.

There are many venting kits available online, including many designed for larger windows and casement windows.


What if I can’t vent the AC unit?

That would be unfortunate. If you are unable to properly vent your AC unit, then this type of air conditioner will not be a sufficient cooling option for your home. You would want to consider an evaporative cooler.

Portable air conditioners work by moving hot air out of the room, so if you’re unable to use a vent, then the machine will not cool your room in an efficient or effective manner. You may feel some cooling if you are directly in front of the unit, but you’ll also notice some ambient heat building from the back.


Can I vent a portable AC through a dryer vent?

Sure, it’s possible. But, it’s probably not the best idea. This is definitely not a good idea if the diameter of the hose doesn’t fit the diameter of your dryer vent. Unfortunately, this is often the case, as many dryer vents in American homes have a diameter of 4 inches, and most portable air conditioners come with a larger vent hose.

If the diameters of the hose and dryer vent are the same diameter, you could attempt to vent your portable air conditioner in this manner. But, again, it’s not recommended and may lead to other problems. So, if you do attempt this, keep a close eye on the device until you feel confident that it is venting appropriately.


How long is the exhaust hose?

It varies. The hose or duct that comes with your portable air conditioner will vary from model to model, but they typically are at least 3-4 ft. in length.

Portable Air Conditioning Unit

You can buy longer (or shorter ones) at many retailers. While it is generally recommended that you buy a longer exhaust hose from the same brand or retailer that you bought your AC unit, this is oftentimes unnecessary.

However, it is important to understand that the longer you make the exhaust hose, the less efficient your air conditioner will be. This may also lead to your unit having to work harder to cool the room, which may cause the compressor to work harder than it should possibly shortening the lifespan of the air conditioner itself.

It would be wise to keep the exhaust hose shorter than 10 ft, unless you also have an exhaust fan of some sort that will help the hot air escape and allow your portable air conditioner to work in a more efficient manner.


Can I make my own exhaust hose?

Sure, but it’s not recommended. There are many scenarios in which a homeowner may desire a longer exhaust hose for their portable air conditioner. Unfortunately, the longer the exhaust hose, the less efficient the AC unit becomes.

If you want to replace the exhaust hose, it is best to buy one that is designed for this type of air conditioner, but if you’re in a bind or feeling handy, you can purchase many of the necessary materials at a hardware store, such as Home Depot or Lowes.

Keep in Mind: If you go this route, make sure the replacement hose is the same diameter as the previous hose or the venting duct in the back of the unit. Most portable air conditioners have a 5 inch hose, but not always. Double-check before you buy. You could also consider using a PVC pipe, but that, too, comes with many disadvantages.


What’s the difference between a single-hose and dual-hose unit?

The way the air moves in and out of the device. Choose a dual-hose, if possible.

  • Single Hose — All air comes in and vents out of the one hose.
  • Dual Hose — One hose is used to pull in air from outside, and the other hose is used as an exhaust.

Dual-hose portable air conditioners are considered to be the better of the two options, as it is more efficient and can cool your living space quicker than single-hose units.


Do portable air conditioners give off carbon monoxide?

No. Because it runs on electricity, you do not have to worry about a portable air conditioner emitting carbon monoxide into your home.

In extreme circumstances, it is possible for a portable or window air conditioner to pull in air from the outside that is high in carbon monoxide. This is possible when a fuel-burning device is directly on the other side of the window. These may include a running car, portable generator or a grill you may be cooking on.

Again, this is an extreme scenario and it is unlikely that a portable AC will pull in enough carbon monoxide for you to experience negative symptoms. But, just in case, it would be wise to know what is going on near the vent, as well as have a carbon monoxide detector in your home.


Is a portable AC the same thing as an evaporative cooler?

No. These are two very different cooling appliances, and not an ideal substitute for each other.

An evaporative cooler, sometimes called a swamp cooler, uses water and the process of evaporative cooling to help make the temperature of the room feel cooler. Unlike portable air conditioners, you have to add water to an evaporative cooler for it to work, and it does not require any sort of ventilation. These are great for garages and workshops.


How loud are portable air conditioners?

It depends on the model you buy. Like most appliances in your home, the amount of noise (or the decibel level of the device) will depend entirely on the model itself.

All types of room air conditioners will emit some level of noise, with some being louder than others. Most homeowners consider this as background noise or white noise, much like your refrigerator or dishwasher.

Unfortunately, decibel ratings are not a spec that manufacturers advertise for portable air conditioners. To get a better idea of how noisy a particular model may be, you will have to read over reviews for each unit and try to make an educated decision for yourself.


Can you soundproof a portable air conditioner?

Not really, but you can take steps to lower the noise. If you buy a portable AC and find it to be loud, you can take a few steps to lower the noise.

  • Softer Surface — Take a look at the surfaces the AC unit is sitting on. If you have it positioned on a hard floor, then you should try to put a small rug underneath the unit. This will help lower the amount of vibration of the compressor and internal fans, and help make it a little more quieter.
  • Change the Fan Speed — It’s also important to note that the decibel level will likely change depending on the fan speed that the device is currently operating on. If it is operating on the highest speed, you will likely hear a little more noise.

Again, the above steps can help you soundproof it, but you will never be able fully eliminate the sound a portable air conditioner makes while it is operating.


What type of electricity do portable air conditioners use?

For typical residential use, portable air conditioners only need to be plugged into a standard electrical receptacle found throughout your home. You will not need any extra power or a special wiring setup to use this type of air conditioner.

The only time you may need a special plug or a dedicated circuit for operation, is for large commercial-sized air conditioners.


Can you use it to cool multiple rooms at the same time?

This depends on a few factors, but is certainly possible. These include the environment in which the air conditioner is being used, how well the air is circulated in this area, and the BTU rating of the device itself.

As an example, if your living space is very open and you’re using a high-BTU unit, then you may feel a cooling effect throughout the entire space. However, if you have a lower-BTU rating and the space is contained with lots of doors and walls, the device will have trouble cooling all areas in an effective manner.

To help you cool larger rooms, consider using a small fan near the air conditioner to help the cold air reach far corners of the space.


Will these AC units work for garages?

Not really, at least not very efficiently.

You can use them pretty much anywhere there is a plug, including inside your garage or workshop. Unfortunately, if your garage door is wide open or the area is not well-insulated, then it is unlikely that you will feel the temperature drop.

To cool your garage, you should consider using an evaporative / swamp cooler.


Will these AC units work for server rooms?

Absolutely! In fact, cooling a server room is one of the most common uses for a portable air conditioner.

Due to the heat that servers generate, especially when clustered together in a small room, it is crucial for you to keep them cool in order for them to operate in an efficient manner. Because of this, portable AC units are often used in conjunction with a central air conditioner to help cool the room with the computer equipment.

If you have a small server room in your home or small business, you may have buy a special vent kit or longer exhaust hose to properly vent the AC unit.


Is a portable air conditioner the best choice for me?

It depends on your situation. This type of air conditioner is great for anyone that wants to cool one room or area of their home, but is unable to do so with a window unit.

Ask yourself these questions:
  • Do you want to have a window A/C unit sticking out from your home? If not, then you should go with a portable unit.
  • Do you live in an area with a zealous Homeowner’s Association? If so, then they’ll likely have rules in place to prevent window units, therefore leaving a portable air conditioner as the best choice.
  • Do you care about your energy usage of a room air conditioner? If so, then a window unit is going to be the best choice for you.
  • Are you capable of installing a window unit? If not, then perhaps you skip the hassle and go with a portable AC.

Keep in mind, a portable air conditioner is a popular cooling option used in millions of homes around the world, but they certainly comes with their own set of pros and cons. If you do your research and make an educated buying decision, you’ll be happy with your choice.


Where can I buy a portable air conditioner?

You can buy portable air conditioners from a wide variety of retailers, both online or in stores.

Before you buy a portable air conditioner at Walmart or Home Depot, we would recommend browsing your options online and narrowing down which model would be best for your home. You don’t have to buy online, but you’ll at least have comfort in knowing that you made an educated buying decision.

Have a question that you didn’t see listed here? If so, please add it down in the comments below.


Broken CFL Bulb

How to Clean Up a Broken CFL Bulb

Using compact fluorescent light (CFL) bulbs in your house is a great way to use less energy, save a little bit of money on your utility bills and help protect the environment.

However, breaking one of these bulbs, as simple as it may seem, can create a dangerous situation. Because of the trace amounts of mercury inside the bulb, it’s important that you take proper precautions if you ever find yourself having to clean up a broken one.

Is a Broken CFL Bulb Dangerous?

Yes, it can be a potential safety concern. The tiny shards of glass that come from the broken bulb can easily cut open your skin.

But, that’s probably not why you’re reading this. I’m willing to guess that you’re concerned about the small amounts of mercury inside of a CFL bulb, and, perhaps, what it’s going to do to your indoor air quality. This is a valid concern.


Is There Mercury In CFL Bulbs?

Yes. It’s true that CFL bulbs have mercury inside them. And yes, if one of these bulbs break open inside your home, your indoor air quality could deteriorate if you don’t take proper precautions.

However, this scenario is much like many other emergency-like situations that homeowners often face. When something goes wrong, you take action before it gets worse. It’s simple.

Let’s look at the science:
  • Study from 2008: CFL bulbs tested contained about 3-5 mg of mercury, but the energy savings of each bulb prevents about 4.5 mg of mercury from being emitted into the air by power plants. Interestingly, this study also found that CFL bulbs contain about 1% of the mercury as old thermostats (500 mg).
  • Study from 2011: CFL bulbs tested only contained 0.1 to 3.6 mg of mercury, and would take up to ten weeks to emit vapors that would be considered hazardous to human health.
  • Study from 2012: Concluded that young infants were at the highest risk, and clean-up within the first four hours after a bulb breaks is “critical.” The study also noted that the temperature and ventilation of the room play a big role in whether the air is safe to breathe.

So, yes… A broken CFL bulb can be dangerous, especially for younger kids. But the danger can be minimized if you act quickly and follow a proper cleanup process.

For more information about the dangers of mercury, please visit the EPA’s website.


How to Clean Up Broken CFL Bulb

Cleaning up a broken CFL bulb isn’t a difficult or harrowing task. It’s a rather simple process that doesn’t require a professional and can be completed within a few minutes. However, because CFL bulbs contain mercury, the process for cleaning it up is a bit more complicated than simply picking up glass.

Below, we have explained the process you should follow if you break a CFL bulb, as well as some general tips that every homeowner should know before they start.

How to Clean a Broken CFL Bulb

Gather Your Materials:

  • Cardboard, heavy-duty paper or plastic scoop.
  • Tape, damp paper towels, or cleaning wipes.
  • Plastic bag or glass jar with lid.

Procedure for Clean-Up:

  1. First, use your cardboard or stiff paper to scoop-up the large pieces of the broken CFL glass.
  2. Next, use tape or damp paper towels to help remove the smaller shards of glass.
  3. Continue previous step until you feel confident that all glass shards have been removed.
  4. Wipe area with disinfectant wipes.
  5. Put all materials into your bag or glass jar, and seal completely.
  6. Dispose immediately.

Note: A glass jar with a tight fitting metal lid is the best item to dispose of the broken shards of glass because it keeps the mercury vapor sealed inside.

If one is not available, a sealable plastic bag, such as a large ziploc bag, will suffice. However, if you go this route, try to handle it as little as possible. You may also want to wear disposable gloves or gloves you don’t mind throwing away in order to prevent the glass shards from cutting your hands.


General Tips Every Homeowner Should Know

Know that you have a better understanding of how to clean up a broken CFL bulb, let’s take a closer look at a few other factors that will help protect you from the mercury inside.

1) Shut Off Central AC

The first step is to turn off your air conditioner, heater, fans or any other appliance that circulates air throughout your home.

The goal with this first step is to prevent the air in the “zone” with the broken bulb from spreading throughout your home. If the area has been exposed to elemental mercury, than it is important that you prevent the air from dissipating to other areas of your home.

2) Air Out & Ventilate Room

Now that you’ve shut off all air conditioners in the room, open the windows and allow the room to “air out” a bit. As noted in the studies above, a well-ventilated room is an important step to limit your exposure.

It would be wise to instruct all people and pets to leave the room immediately, taking precautions to avoid the area where the bulb was broken. Once everyone has left the room, you should open windows, doors and vents to the outside, but not into the house. Use this time to gather your materials.

CFL Bulb

3) Clean Up Within Four Hours

Allowing the mercury to sit, undisturbed, in a room with no ventilation is extremely unsafe and will quickly degrade the indoor air quality of your home. If you’re using an air conditioner, no matter what kind it may be, turn it off.

As the study above concluded, the first four hours are the most important. Try to clean it up within that time frame.

You have absolutely nothing to gain by waiting.

4) Safely Collect & Seal Debris

After you’ve gathered what you need, re-enter the room where the CFL bulb was broken. Leave the windows, vents and doors to the outside open in order to continue to let the mercury vapor dissipate.

Scoop up the larger pieces of glass from the floor. Place the shards into the glass jar or ziploc bag. Use the tape to pick up the smaller pieces of glass. Make sure that all glass is removed from the hard surface or carpet.

Once the glass has been picked up and placed in the jar, use the damp paper towels to clean the affected area. Disposable disinfectant towels will also be good for this purpose. All of these wet wipes should be placed inside the jar or ziploc bag. If you wear disposable gloves while cleaning up the mess, those too should be discarded inside the container

Once this has all be completed, tightly seal the jar or ziploc bag.

5) Remove From Home Immediately

Now that the broken bulb has been picked up, remove it from the house immediately. This is especially important if you used a plastic bag. This is because the plastic may not completely contain the mercury vapor inside. If not, it may then leak out into the air inside your home.

6) Never Use a Vacuum Cleaner. Ever.

Trying to vacuum up the glass from a broken bulb will only further fan the mercury vapor into the air. This is exactly what you want to avoid. Contain, not circulate.

Of course, depending on the type of floors that the broken bulb is on, this is easier said than done. Below, we have listed out some tips for cleanup based on the type of flooring.

  • Hardwood & Tiled Floors — It would be avoid the vacuum cleaner entirely. Stick with using a steam mop, swiffer or wet wipes to clean up the tiny shards of glass.
  • Carpets & Rugs — On a carpeted area, it can be difficult to find all the smaller pieces of glass from a broken bulb. Vacuuming can help, but it should be done with windows open and entry ways into the rest of the house closed.


No matter what type of flooring you have, once you completed the cleanup process listed above and picked up as much of the broken bulb as possible, you will be able to then — and only then — use the vacuum cleaner.

Note: If you decide to use the vacuum cleaner, it would be wise to use the hose attachment, keep the area well-ventilated and dispose of the bag / empty the canister as soon as possible. You don’t want CFL debris sitting inside your vacuum cleaner for an extended period of time.

7) Always Wash Your Hands Immediately After

Even if you wear gloves when you clean up the broken bulb, there is no guarantee that mercury didn’t get onto your hands. After cleaning up the shards of glass and throwing all the debris away in the best possible way, thoroughly wash your hands with soap and hot water.

This will help remove any small pieces of glass that may be lingering on your hands. It will also give you more peace of mind about residual mercury.

8) Dispose Hazardous Waste Correctly

Check your local regulations for the best way to properly dispose of broken CFL’s. Some municipalities may require you to dispose of the hazardous waste in different manners. Some simply allow you to throw it out with your garbage.

Of course, you could always toss it out and know one would ever know. But, you don’t want to inadvertently contaminate another area of our community. So, be a good neighbor, follow the law and dispose accordingly.


Summary

Cleanup of any broken CFL bulbs should be prompt and precise. Shut off your air conditioner to prevent circulation of air. Open windows to ventilate air in the area. Never, ever use a vacuum cleaner. And, seal the broken shards in bag or jar and remove from your home as soon as possible.

Garbage Disposal

Garbage Disposal FAQs

What is a garbage disposal?

A garbage disposal is a motorized appliance installed underneath your sink that allows you to finely grind food waste into small particles that can be safely disposed of down your drain.

Common names include:

  • Waste disposal unit
  • Garbage disposer
  • Garburator
  • Insinkerator (popular brand)

How do garbage disposals work?

A garbage disposal is really just a simple demonstration of Isaac Newton’s laws of motion.

Garbage Disposal Diagram

The moment you turn on your disposal, a small plate at the bottom of the “grinding chamber” starts to rotate at high velocity.

On this plate, you will find two impellers. These are essential components, as they help create the necessary centrifugal force that propels the scraps of food against the internal wall of the chamber. This wall grinds the food down into tiny particles that can flow down the drain.

Contrary to popular belief, most homeowners believe that a garbage disposal works much like a blender. While they indeed have many similarities, this is factually incorrect. There is no chopping, cutting or chewing involved in the process. In fact, a garbage disposal doesn’t even have blades!

This animation provides a great visual explanation of how a disposal works.


What size garbage disposal do I need?

This is a question with an impossible answer. Every homeowner will have different needs based on their unique situation.

To find the right size disposal for your home, you should first consider how much power you will need. This can be determined by considering a few factors.

  • How many people live in your home?
  • How often will you be using the disposal?
  • What kind of food do you currently prepare, and how much waste does it create?

Common Sizes:

  • 1/3 horsepower
  • 1/2 horsepower
  • 3/4 horsepower
  • 1 horsepower
  • 2+ horsepower

Generally, the more people in your home, the more often you’ll be using the disposal, thus the more power (or larger size) you’ll need.

However, you should also consider the types of food waste that you’ll be putting in the disposal, as well as the volume you think you’ll create.

Note: When it comes to garbage disposals, the term “size” refers to power, not the actual dimensions of the unit. Another important consideration, but one that is unlikely to affect your buying decision, but does play a role in the installation.


What items can you put in garbage disposal?

This is a great question that more homeowners should be asking. A common misconception is that anything and everything can go down a garbage disposal. In reality, there are a number of items that should never be put down a disposal. This includes the scraps of many popular foods.


Never put these in disposal:

  • Cooking oil / grease
  • Stringy fruits and veggies
  • Pasta
  • Rice
  • Beans
  • Coffee grounds
  • Eggshells

Note: If you have a large, powerful garbage disposal from a reputable brand, then some of the items listed above would likely be okay to put into the unit. However, to prevent possible problems and ensure your garbage disposal has the longest life, it is recommended that you avoid the items above.


Why does my disposal smell?

There is likely food waste inside the grinding chamber that is starting to rot. It may be that you didn’t grind your last batch long enough, or perhaps there is food stuck inside the unit or not flushed down the drain properly.

To eliminate these odors, you should run plenty of cold water into the unit and turn it on. Allow it to fully grind and flush all items inside the chamber. Next, you should thoroughly clean your disposal to eliminate all bacteria that may be lingering and contributing to the odor.


What’s the difference between continuous & batch feed?

These are the two types of disposals you will choose from. Here is a general summary that highlights the differences between the two.

  • Continuous Feed:

    The most common type of disposer found in homes, these are considered to be effortless and simple to use. All you do is turn on the cold water, flip the power switch and add your food scraps. You can continue to let the unit run until all food waste has been grinded and disposed.

  • Batch Feed:

    Slightly more difficult to use, this type of disposer only allows you to grind food in smaller batches. In order for these to work, you must use a stopper to activate the power. Without the stopper, the device will not work. While they require a bit more work, they are considered to be the safer option.

Which one is better?

This is entirely dependent on your situation. Like most appliances, they each come with their own set of pros and cons.


Do you need to run water when using a garbage disposal?

Yes. It is recommended that you run the water while you operate the disposal. This will not only help the device grind your food waste, but also guide the small particles down the drain and prevent potential problems, such as a clog in your pipes or within the disposal.

  • Cold Water:

    When you are grinding food waste, you should always use cold water. This will prevent the fats within your food from liquefying, which may create a clog when the temperature cools and these fats once again solidify. By running cold water, you keep these fats in a “solid” state, which makes it easier to grind and eliminate.

  • Hot Water:

    When you are cleaning your disposal, you can use hot water. However, this is dependent on how you are cleaning it. If you are using cleaners, such as vinegar, baking soda or citric acid, hot water will be fine, perhaps even helpful. However, if you are grinding food — such as citrus peels — to help clean the disposal, then you should stick with cold water.


How do you install a garbage disposal?

While there are some general commonalities that are helpful to know, there are no specific set of installation instructions that work for every garbage disposal.

It is always recommended that you refer to and follow the owner’s manual that came with your disposal for precise installation instructions.

Garbage Disposal Installation
  • Replace:

    The installation process for replacing a garbage disposal is a somewhat complicated project for the average homeowner. If you’re relatively handy, you will likely have no trouble doing it on your own. However, if you are not confident in your plumbing skills, it would be best to hire somebody.

  • New Install:

    If you are adding a disposal as part of a kitchen remodel, the installation process is going to be significantly more difficult than a simple replacement. Still not impossible for your average DIY homeowner, but you’ll now have to consider the cost of wiring and other possible electrical needs. It may be wise to hire somebody.


Can I call someone to help with installation?

Absolutely! There are plenty of handyman, plumbers and other general contractors out there that will do this job. Just make sure you do your research and hire only a qualified, certified and licensed contractor. If you decide to go this route, make sure you read these tips from the FTC first.

Depending on the retailer that you bought your garbage disposal from, they may offer installation services. Likely, this will include an extra charge, but it’s well-worth the security of knowing that your unit is installed correctly, by a professional.


Are disposals loud?

Yes… and no. This is hard question to answer, really.

The overall decibel level will vary from model to model. Because it’s a motorized appliance, all garbage disposals will create some level of noise during operation. Much of the noise is due to the vibration created while the disposer is being used.

If noise is something you are concerned about, then you should look at buying a garbage disposal that has built-in insulation and anti-vibration features. Some manufacturers will also list the decibel level within the specs of each model.


Why is my garbage disposal humming / buzzing?

A common problem that homeowners may experience, this humming sound occurs when the disposal is clogged or jammed by an object inside. The unit is still receiving power when you try to operate it, but unfortunately, it is unable to grind food because it is jammed.

You do NOT need to call a plumber for this. It is a relatively easy fix that should only take a few minutes.

How to Unclog:

Find the owner’s manual for your disposal. Look for instructions on how to troubleshoot this humming problem. If you can’t find the owner’s manual for specific instructions, then you should carefully try to unjam it.

You can try following these instructions:

  • Unplug disposal.
  • Get the allen wrench that came with the unit, or find one that will work.
  • Crawl under your sink and look for a small hole that fits your allen wrench. It will be hexagon-shaped.
  • Insert allen wrench and turn. This should unjam the unit.
  • Plug in and turn it on.

Note: These are general instructions to unclog your garbage disposal. It is strongly recommended that you follow the instructions that the manufacturer provides for that specific model.


Where is the reset button on my disposal?

The reset button on your disposal is located at the bottom exterior of the unit. It is likely red, but this could vary. Please refer to the owner’s manual to understand how to properly use the reset button on your specific disposal.


Can I use a disposal if I have a septic system?

You can, but it’s not recommended. When you have a septic system, disposing of food waste down the drain is a bad idea for the following reasons:

  • You may disturb the balance of bacteria within the tank.
  • You fill up the tank quicker, thus have to pump it more frequently.
  • You may inadvertently cause problems with the tank, which may lead to costly repairs.

Who do I call to repair a disposal?

A plumber will be your best bet for repairing a garbage disposal.

However, depending on what the problem is, you may be able to repair it yourself. Before you call and hire someone, try to troubleshoot the problems and determine if you can fix it on your own.

For example, a clogged disposal is an easy fix for homeowners to do on their own. But, if the disposal is leaking, then you should turn off the water and call a a plumber.


Where can I buy a garbage disposal?

You can buy a garbage disposal from a wide variety of retailers, including both online or inside a store.

Before buy the first disposal you find at Home Depot or Lowes, we would recommend browsing your options online and narrowing down which model would be best for your home. You don’t have to buy online, but you’ll at least have comfort in knowing that you made an educated buying decision.


Wasp

How to Get Rid of Wasps & Hornets Around Your Home

Wasps. The winged menace that take over patios and gardens all around the world. The evil cousin of the honey bee that fears no human.

Well, that’s their reputation, but an obvious exaggeration.

For the most part, wasps, hornets and yellow jackets generally try to avoid human interactions. Regardless, very few homeowners welcome the spring invasion of nests. It’s always preferable to ensure that these insects are kept away, especially if their nest is near a doorway or other area that increases your chances of crossing paths.

With this in mind, let’s discuss some methods that every homeowner should know to get rid of wasps, create an unwelcome environment, and, most importantly, help you avoid getting stung.

How to Keep Wasps Away From Your House

Like many other insects in your garden, wasps are going to go where they believe food is. So, if you want to limit the amount of wasps living near your home, then you need to attempt to limit their food source. This means ensuring that no food is left out in the open. Especially, sugar sweets and fruit.

During the summer, you may enjoy having a meal in your backyard. All that food can be rather enticing for wasps, yellow jackets and other insects. That is especially true if you have anything sweet in the vicinity such as an open can of soda or juice box. Always cover your drinks if you are outside.

Citronella Plant

Grow Plants That Wasps Don’t Like

A great way to prevent wasps from living around your home is to grow plants that will deter them. This is an ideal solution for homeowners that want to keep wasps at bay, while also adding beauty to their yard.

Generally, wasps do not go near the following plants:

  • Citronella
  • Mint
  • Eucalyptus
  • Wormwood

Incorporating these plants into your landscaping will help create an environment that wasps and hornets do not like. Therefore, they will likely look for another location to build their nest.

Bonus: A few of these plants also repel other pesky insects, such as mosquitoes.

Maintain Your Fruit Trees

Additionally, you want to be mindful if you have any fruit trees in your yard. Throughout the year, a piece of fruit may fall off and smash to the ground. With all the sweet juices now in the open, it can attract certain pests, including wasps.

Try not to make the area more appealing than it needs to be. Regularly inspect underneath your fruit trees and remove any pieces of fruit as soon as they hit the ground.

Create & Hang a Fake Nest

Wasp colonies are incredibly territorial. If wasps believe there is another colony already living in the area, then they are likely going to look elsewhere to make a home.

Hornet Nest

There are a couple of ways to accomplish this. The easiest method would be to buy a fake nest online. Or, you can make a fake nest with a brown paper bag.

How to make a fake wasp nest:

  1. Fill your brown paper bag with crumpled newspaper or debris.
  2. Close off the opening with sting or tape.
  3. Crumple the bag a little bit, to give it the appearance of a hornets nest.
  4. Hang it in the area where you don’t want wasps buzzing around.

This is a great way to deter wasps, as they will not want a confrontation with other colonies already living in the area.

Other Ways to Prevent Wasps From Living Near Your Home

While the food source is going to be the best method, there are a few other ways you can deter wasps and yellow jackets from living around your home.

  • Seal Cracks, Window Frames & Entry Points:

    Before summer comes around, you should thoroughly inspect your house to see if there are any cracks or other entry points in the siding. You should also inspect door and window frames to make sure there are no areas for wasps to get into.

  • Sweet Perfume:

    You also want to avoid wearing any sweet perfume during the summer. The scent you are emitting can attract the pests.

  • Bright Clothes:

    Finally, avoid wearing clothing that contains flower imagery or is generally bright. That can catch wasps’ attention, and they may curiously come to you to see if you are actually a flower.

TL;DR — If you do not give wasps a reason to buzz around your property, then they are probably going to go elsewhere and leave you alone.


General Tips to Removing a Nest

If you decide you want to get rid of a wasp nest on your own, then it would be wise to understand and follow these general tips.

Wasp Nest
  • Wear Protective Equipment:

    Keep yourself safe by wearing long sleeves, protective eyewear, and gloves. If you have a bee hat, that would be ideal. But, most homeowners will not have these.

  • Neutralize at Night:

    To ensure you kill the entire colony, as well as the queen, it is recommended that you exterminate the nest at dusk or night. Not only are wasps and hornets less aggressive at this time, but the entire colony will be back in the nest for the night.

  • Locate & Target the Opening:

    If possible, try to locate the opening of the nest. This will usually be located near the bottom. Spray your soapy water or pesticide in this area first, and then target the rest.

  • Do Not Stand Below the Nest:

    Most wasps and hornets will fall the moment they get sprayed. Because of this, you should not stand directly below the nest, unless you want to be exposed to chemicals or get stung by falling wasps.


4 Methods to Kill & Remove Wasps

In the event that you notice wasps, hornets or yellow jackets buzzing around your home, then your already beyond prevention. You’ll need to find a way to remove them.

The easy way would be to simply spray them with pesticide. But, do you really want to spend money to spray a poisonous substance around your home? Instead, try using a few of these tips to help you get rid of wasps naturally.

1) Spray With Soapy Water

An easy, DIY alternative to spraying pesticide is to create a solution of dish soap and hot water. Spray this onto the nest. This is the recommended first step that every homeowner should try. This will kill the wasps naturally and, most of the time, instantaneously.

How to Make:

  1. Mix solution in a spray bottle.
  2. For every cup of hot water, you’ll want to add 2-3 oz of dish soap.
  3. Shake vigorously.
  4. Spray directly onto nest while the water is still hot.
  5. Run.

Stay mindful of your escape route. Once you apply the soapy water, it is likely that you will agitate the hornet nest and they may try to attack. You could also try mixing in other detergents that are around your home.

Benefits:

  • Safe for all occupants and pets.
  • Cheap and easy to make.
  • Likely, you already have all supplies.
How to Get Rid of Hornets Nest

2) Suck Them Up With A Vacuum

Another easy way to remove wasps are to suck them into your vacuum cleaner. Most homeowners have a vacuum in their home, making this a zero cost way to remove adult insects.

Simply use the attachment hose, get close to the nest and turn it on. This will suck the adult wasps into the vacuum, containing them in an area where they pose no risk to you. Of course, this means you have to be brave enough to get close to the nest.

Benefits:

  • Costs nothing.

Disadvantages:

  • Need to get close to the nest, and are more likely to get stung.
  • You still need to destroy the nest.

3) Set Up Traps

If you don’t want to go near a nest and risk getting stung, you should consider setting up a few traps. There are a variety of different traps that will work.

You will want to hang these traps in areas where you, your family and your guests are not going near.

These traps consist of sweet-smelling solutions so wasps and other pests go to it and end up getting stuck. You can purchase wasp nests or make your own if you want to make it a DIY project.

  • Glue Trap — Widely available online and at many retailers, this type of trap is covered in sticky adhesive that makes it difficult, if not entirely impossible, for wasps to fly away after they’ve landed on it. While an effective method, this type of trap is often criticized due to its ability to trap other insects and the slow nature in which they die.
  • Bait & Lure Trap — Another trap you can use is a bait and lure trap. There are many versions available, including a few you can make yourself, but they all essentially accomplish the same task: Use bait to lure a wasp into the trap, where they are unable to escape.

How to Make Your Own Wasp Trap

  1. Cut the top off of a plastic 2-liter bottle.
  2. Fill the bottom part with sugary water.
  3. Turn the top part upside down, with the bottle top pointing downward.
  4. This configuration makes it difficult for a wasp to fly out.

4) Spray Nest With Insecticide

If the above methods fail or you just prefer to start with a commercial insecticide, here are some general tips you should know before you buy.

  • Active Ingredient:

    It’s important that you get an pyrethrin or pyrethroid insecticide. The EPA has tested and determined that these “do not pose risk concerns for children or adults.”

  • Look Closely at the Label:

    The words on the label are important. If you’re trying to kill wasps or hornets, make sure to buy an insecticide that is specially formulated for these pests. These will typically have “WASP” prominently displayed.

  • Caution vs. Warning:

    Another important factor are the “signal words” on the label. Insecticides labeled with “Caution” are going to pose less of a risk to humans than those labeled with “Warning.” Either way, they’re both toxic. With this in mind, you should always exercise caution and take measures to protect yourself while using any insecticide.


Final Thoughts

Keep in mind: Simply knocking down a nest is not a complete solution. The remaining wasps will build a new one.

These are a few of the tips to get rid of wasps around your home. However, despite your best efforts, the day may come when you get stung. Clean the site immediately when this occurs. You may need to apply some antihistamine if it begins to hurt. In the event you have an allergic reaction to a wasp sting, you need to seek medical attention immediately.

Water Quality

How to Test the Quality of Your Drinking Water

The majority of homeowners in the United States get their drinking water from public water treatment facilities, and we tend to accept without question that the water that flows from our taps is clean and safe to drink.

But is it?

Americans use thousands of different chemicals every day. Unbeknownst to us, many of these substances ends up in our lakes, rivers and aquifers. These may include pesticides, pharmaceuticals, solvents, weed killers, cleaning agents, you name it — all of these contaminants eventually finds its way into our water supply.

How Does Our Water Become Contaminated?

The contaminants that degrade the water quality come from a number of sources. Some of it gets there from people dumping it down their toilets, while other chemicals show up thanks to runoff from farms or mining, leaching from landfills, or improper storage and disposal at manufacturing plants. In addition to the chemicals, many of our waterways are filled with harmful bacteria, such as E. coli.

Some of these contaminants get removed during sewage treatment procedures, but others find their way into the waterways around our homes. It’s up to our water treatment facilities to properly process the water, removing all toxins to make it safe for us to drink before piping it to our homes.

Water Contamination

Is Your Drinking Water Safe?

The Environmental Protection Agency regulates a number of harmful substances, such as uranium, lead, and arsenic. For each of these, the EPA sets a Maximum Contaminant Level indicating at what concentration these chemicals and minerals can exist in our drinking water before it is considered unsafe to drink.

Each summer, the EPA issues a report for most municipal water systems in the country. These Consumer Confidence Reports (CCR) can be searched on the EPA’s website.

In the CCR, at minimum you can expect to find the following information:

  • The source of your drinking water.
  • A discussion of the general risks of contamination.
  • A list of regulated contaminants and their levels in the water at the time of testing.
  • Possible health risks from these contaminants found in excess of EPA standards.
  • What your local water treatment facility is doing to correct any problems.

The Downside of the EPA’s Annual Water Quality Report

While these reports are a great resource that provide a high-level overview of what’s in the pipes in your home, they cannot reliably provide a complete picture of your water quality.

EPA Water

For the reports, water is tested only once or twice a year and contaminant levels are averaged out across 12 months. Contamination can occur outside of testing periods, or there can be occasional spikes in certain contaminants that exceed EPA regulations, and these issues may not be captured in the report. Furthermore, it’s possible for your water to become contaminated after it leaves the treatment facility.

Contaminants Not Measured by the EPA

As another point of concern, just a few of the chemicals that can be found in our drinking water are measured or regulated by the EPA. Independent water testing laboratories confirm a wide variety of contaminants that may be found in our water supplies. In water samples taken from across the country, these labs have discovered measurable quantities of contaminants as varied as antidepressant medications, artificial hormones and gasoline additives.

The EPA doesn’t regulate most of these chemicals in our drinking water. Although most will only occur in trace amounts, there’s no way to know what the chemical cocktail might be doing to our health. Most of these unmeasured contaminants have no taste or color and pass through our water and into our bodies undetected. While many of these substances may be harmless in and of themselves, there are few studies to suggest what these different chemicals might do in combination with others.


When Should You Get Your Water Tested?

The EPA recommends you test your water annually to get a sense for what you may be drinking and if there are changes over time. In addition to yearly water tests, some of the things that should prompt you to test your tap water immediately include:

Water Quality Testing
  • Recurring stomach or digestive issues: This may be a sign of bacterial contamination.
  • Cloudy, frothy, discolored or smelly water: This can be caused by a number of contaminants.
  • Living in an older home: Aging plumbing may leach copper and lead into the drinking water.
  • Red or rust-colored stains on your sink or clothing: This is a sign that your water has high levels of iron or other minerals.
  • Nearby coal, gas or agricultural activities, especially fracking: These industrial areas may lead to pesticides, herbicides or solvents leaching into your water.
  • Living close to landfills, gas stations, industrial plants, dry cleaners: Many substances can leach into the ground and, possibly, contaminate local water supplies.

For a more comprehensive list, the EPA offers this handy chart (PDF) that can help you determine when you might want to test your water, with symptoms that can occur with certain contaminants.


How to Find Out What’s in Your Water

If you’re experiencing any signs that indicate something could be in your water, or if you want to test your water for your own peace of mind, you have a few options to choose from. The cost and accuracy will vary, so it’s important to do some research on your options prior to investing.

Sending Samples to a Testing Lab

There are many professional water testing labs that can provide extensive testing on water samples you provide. They send you a kit and instructions on how to collect water samples, and then you send the samples to the lab for evaluation.

How to Test Water Quality

Generally you can choose which kinds of tests these labs will perform, from testing for common contaminants to specialized tests for radon, uranium or other substances depending on your location and personal concerns.

These labs provide tests for tap water from both water from city treatment plants and well water, so they’re a good option for the majority of homeowners. The least expensive tests run about $50 and the most extensive ones can cost over $400, so it’s a good idea to know what you’re looking for before purchasing a test kit.

Is a DIY Water Testing Kit Worth the Cost?

Those costs may seem exorbitant, and you do have other options. There are inexpensive home testing kits you can purchase from home improvement stores and online merchants. These kits purport to test for bacteria, lead, pesticides, chlorine, nitrates and nitrites, and can also tell you the hardness and pH of your water.

These kits may seem like a great way to check your water quality and identify potential problems, but they cannot test for all contaminants, including fluoride and glyphosate. They are also far less reliable than laboratory tests, so the results should be taken with a grain of salt.

Do These Types of Kits Even Work?

Good Housekeeping performed a review of different do-it-yourself home water testing kits. Their results showed that most of the common tests inaccurately measured levels of certain contaminants, while entirely missing others. Even worse, many of these tests have given false positives that may cause you to take expensive preventative action when no such need exists.

So, what should you do?

If you’re just curious about your water but have no serious concerns, trying out a DIY kit may be a good place to start. However, if you have any concerns about your water quality, or you have anyone with health issues, small children, or elderly family members, you should probably consider a professional testing lab.

Just be careful: There are some labs out there that offer “free” water testing, but those usually are fronts for companies that want to try to sell you expensive filtration solutions you don’t need. You can find some of these “free” options available near many Home Depot locations.

If you have evidence of contaminants in your water, you can report it to the EPA’s Safe Drinking Water Hotline, 1-800-426-4791.


How Can You Remove Contaminants?

For some contaminants, it’s easy to remove them with a filter that attaches directly to your faucet or by using a water pitcher filter.

These filters are inexpensive and easy to maintain, using activated charcoal as their primary filtration medium. They are perfect for removing chlorine (commonly added to disinfect municipal water). Depending on the manufacturer and freshness of the filter, they can also remove trace amounts of minerals such as zinc, lead, copper, and asbestos, as well as some bacteria or other biological contaminants.

Removing Lead from Drinking Water

Because of the significant health problems associated with consuming any levels of lead, if you’re concerned about the lead content in your water, be sure to do your homework. Most pitchers and faucet filters are not certified to remove lead from drinking water.

Reverse Osmosis System

Furthermore, a number of other contaminants cannot be removed with inexpensive filtration solutions. For safe removal of lead, pesticides, glyphosate, fluoride, and many other contaminants, a reverse osmosis filter might be the best solution. For many homeowners, the best choice will be a reverse osmosis filtration system that is installed directly under the kitchen sink, but you can also install a “whole-house” unit that works for the water in the entire home.

What is Reverse Osmosis?

Reverse osmosis is the process many bottlers use to produce ‘purified’ water, and this type of filtration will remove the majority of contaminants from your water. The downsides of these units include a high initial setup cost and a higher consumption of water as part of the filtration, which will increase utility bills.

Hopefully now that you’re armed with all of this information about water quality and filtration, you will be able to make an informed decision about when and why to get your water tested, as well as have some solutions if you find out you do have unwanted substances in your drinking water.